Categories
Google Software

How to Record a Google Hangouts Call with Movavi Screen Recorder

By using Google Hangouts you can quickly place video or voice calls to your contacts. Despite the many features in this communication platform, however, there is one that it lacks: The ability to record and save calls so that they can be referred to later.


If you would like to record one of your Google Hangouts calls, you could easily do so with Movavi Screen Recorder. As a screen recorder, it will let you record the video footage of your call directly from your screen, and it will be able to capture the audio from your speakers and microphone as well.

Movavi-screen-recorder

Due to the intuitive user interface and simple controls of Movavi Screen Recorder, you should be able to figure out how to set it up to record a Google Hangouts call relatively quickly. The first step would be to open Google Hangouts and prepare to place the call, then launch Movavi Screen Recorder before doing so.


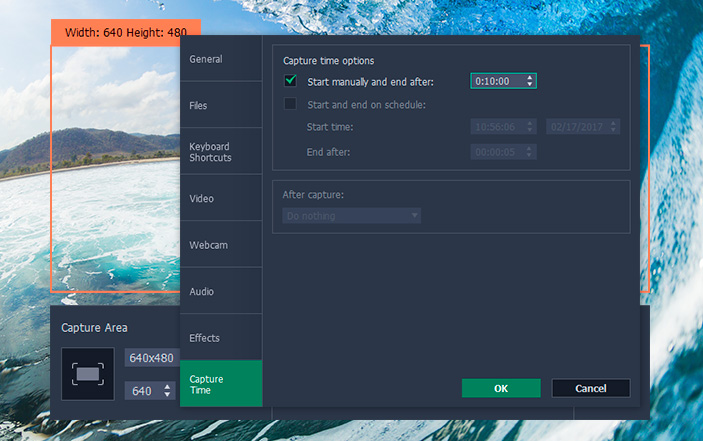
To configure the capture area so that it encompasses the Google Hangouts call, click and drag your mouse cursor to draw a frame. Another way to do so in Movavi Screen Recorder is to click anywhere so that the interface appears then select one of the presets in the ‘Capture Area’ list. Regardless of which method you use, you can then refine the frame by resizing and repositioning it so that it fits properly.


When you’re satisfied that the frame encompasses the Google Hangouts call as accurately as possible, check Movavi Screen Recorder’s interface to make sure both the ‘System Audio’ and ‘Microphone’ icons are highlighted, or click on them once otherwise. Once that has been done you can click ‘REC’ at any time to start recording and place the call.


It should be easy to control the recording process itself using the on-screen controls in Movavi Screen Recorder’s interface. When the call is finished you can then click ‘Stop’ and the video that you recorded will be automatically saved in MKV format. In the preview window that appears you can trim out any parts that you don’t need, and click ‘Save As’ to save the changes or select a different format.


If you’d like to learn more about Movavi Screen Recorder, you should experiment with its other features as well. It can automate the recording, capture keyboard and mouse actions set the frame rate, and much more.


As you can see it won’t take long to set up Movavi Screen Recorder and start recording a Google Hangouts call. The same applies for any other footage you’d like to capture from your screen, and undoubtedly you’ll find several other ways in which you can use it.

Categories
Windows

Partitioning HardDrive with EaseUS Partition Master

It certainly feels great, now that you had just upgraded to a brand new large capacity hard drive. But did you know that you will need help in the form of a software that allows you to convert mbr to gpt without data loss? Or to be able to partition external hard drive, in order to make it more efficient?

With EaseUS Partition Master Free 10.5, you certainly can. 30 million users worldwide can’t go wrong. In fact, this highly popular free disk management software is an all-in-one solution that provides for your disk management, partition recovery and cloning needs.

Any hard disk larger than 2TB would require you to use gpt partition. That is the limitation by the older mbr partition. This is where you can use this free software to convert mbr to gpt without data loss. What’s more, you can now partition external hard drive and organize it in a much proper way.

It is actually very easy convert mbr to gpt without data loss. First of all, you will need to download, install and launch the application. Once you’ve launched it, it will show up a main window that gives you an overview of all your pending operations, a map of each disk, and a list of the partitions on all the disks.

You can also partition external hard drive by plugging it into your main system. It should be able to detect your external hard drive and that’s where you can resize, move or even merge the partition external hard drive accordingly.

In fact the latest free version 10.5 also supports up to 8TB hard drive, so you know you are in safe hands the moment you want to upgrade. Plus there’s the all-new user interface which makes it even easier for you convert mbr to gpt without data loss. All you need to do is follow the step-by-step and on-screen instructions to complete the whole process. If you had just recently upgraded to Windows 10, then it is also good to know that in this latest version; it does support the latest OS from Microsoft. It is very handy in solving the low disk space problem in Windows 10, especially if you had just upgraded your OS.

You don’t have to be a computer expert in order to convert mbr to gpt without data loss. It also allows you to partition external hard drive in just a few steps. Go ahead and download your free copy today.

Categories
Software

One click file converter for your Cloud Storage

Cloud storage services such as Dropbox and Google Drive are definitely some of the most used online applications of today. They enable you to have your most important files available to you, no matter whether you are working from your home, office or on the go using a mobile device.

Online file conversion tools are also in very high demand and enable you to convert files to and from various formats at all times. The new Cometdocs desktop app is a tool that allows you to combine these two great types of services.

A popular online document management service itself, Cometdocs  allows its users to store and transfer files to others within the cloud. However, its most popular feature is its file conversion technology. Cometdocs allows its users to perform conversions between various formats (PDF, Word, Excel, PowerPoint, AutoCAD, HTML, and more).

The service has released a slew of updates recently, including a new mobile app for iOS users and an API service for developers interested in using Cometdocs’ conversion technology in their own applications.

The new desktop app and Cometdocs’ recent integration with Google Drive and Dropbox are a couple more incredibly useful new features that have recently been unveiled.

The desktop app makes the process of converting files online incredibly convenient and easy. Let’s take a look at what it does.

Converts files with just one click

cometdocs 3 converted files

Once you have become a registered Cometdocs user, simply download and install the desktop app. Once the app is installed, all you have to do is locate the file you want to convert and right-click on it. Find the Cometdocs icon in the menu and select your desired conversion. Cometdocs is great for converting PDFs into more editable file formats such as Microsoft Excel, Word, PowerPoint and many others. You can also use it to convert these types of file formats, and many more, into PDFs. The service also supports XPS conversions, which is rare in the world of free online file converters.

It’s incredibly convenient and fast

Once you have selected the file conversion option, the file is sent to Cometdocs’ online server and is quickly converted. The newly converted file is then automatically downloaded to the folder in which the original file is located. So if you are converting a file from your Dropbox or Google Drive folder – or any other cloud service folder, for that matter – the newly converted document is immediately downloaded to that same folder and synched into your cloud storage. Most online file conversion services require you to perform the conversions through your browser and then retrieve a link for downloading the file from your email client, but not the Cometdocs desktop app. Conversions are automatic and massively convenient.

Convert large files bypassing your browser entirely

If you have ever tried converting a large file via an online conversion service, you know that it can be a tedious process. You need to keep the browser window open while the large file is being uploaded, and this process can slow down your browser and make it hard for you to work on other tasks while the conversion process is unfolding. If you have the Cometdocs desktop app installed, you don’t ever have to open your browser to perform a conversion. Upload the file directly from your desktop and continue using your browser normally while the upload and conversion are being performed. It’s a lifesaver when it comes to multi-tasking.

cometdocs 3 converted files

The app is also very lightweight and it never slows down your computer. The conversions are not being performed by the app itself; it’s simply a vessel that sends the file to the Cometdocs server, which is yet another huge benefit when it comes to convenience and perfecting your multi-tasking process.

If you are someone who regularly uses online file conversion services and are looking for the simplest and most effective way to perform these conversions, sign up for a free Cometdocs account and check out this great desktop app. It’s an excellent time-saver and a very valuable productivity tool that you can use on its own or integrate with your favorite cloud storage services.

Categories
Windows

Should I upgrade to Windows 8.1?

The public release of Windows 8.1 code-named Windows Blue  is around the corner (The expected release date in 17th October). This is a much anticipated release, as it is said to bring many radical changes in Windows 8. So many of us are contemplating to upgrade to Windows 8.1 as soon as possible. Those lucky few with access to MSDN and Technet has already got the privilege to test it out. Starting 17th October, Windows 8.1 will be available via Windows update for all existing users and those who want to upgrade, they can do so by going for a fresh installation of Windows 8.1, which will be available as a standalone product.

Let’s see if this new Windows 8.1 hype is how justified and you can decide if you really need this update?

Key Features of Windows 8.1

Start Button

When Windows 8 was released, the users were much surprised when they did not find the Start button, which Windows users were used to since Windows 95 days. So there was much condemnation to Microsoft as they released a Windows OS sans Start menu. Infact it is very difficult to work without a Start menu. So with Windows 8.1 everyone was expecting at least the Start menu and Microsoft disappoints again. What they did is just put the Start button which helps in navigating between Metro Interface and normal Desktop which was earlier present on the charm bar. So the only USP for Windows 8.1 for a general user is not met which is a major disappointment.

Lock Screen

The Lock Screen in Windows 8 was used by users to display the photos of their loved one. So Microsoft though to take this a step further and convert the Static lock screen photo to a full featured slideshow. Now you can choose photos from your harddrive or from skydrive to display a slideshow on your lock screen. Now when you are on lock screen, you do not need to enter a password to open the camera or answer a Skype call.

windows-8.1

Start Screen

Windows 8.1 has got bigger tiles size as well as now you can resize the live tiles. But the tile size is specific to each app. But most of the modern mobile app tiles are resizeable in any of the four ways viz. large, wide, medium and small. The video below explain how the live tiles can be re sized in Windows 8.1

Smart(Hero) Search

The new search in Windows 8.1 is a big improvement than its predecessor. The Smart Search powered by Bing is capable of finding lot more things for you. It will now index apps, documents,web content and probably emails. What you get in search result depends upon what you are searching for. The image below shows how the smart search bring result for a search term “Bill Gates”

smart-search_windows8.1

An indepth explanation of the Smart Search can be found at Win Supersite.

Snap View

The snap-view or split-screen as we generally know was introduced with Windows 8 for better multitasking. But this had a major flaw in Windows 8 as the screens were being divided at 70/30 ratio, making the app occupying the smaller screen virtually unusable. Now with 8.1 the screens can be resized at 30/70, 40/60 or 50/50 and for bigger resolution even 3 apps can be opened and workd on simultaneously.

Boot To Desktop

One of the major enhancement in Windows 8.1 is the ability to boot to the desktop. So every time you start your PC you do not go through the Start Screen and click on Desktop tile to go to the classic desktop view. This is useful especially in corporate environment and for those who largely use desktop mode in their windows 8/Windows 8.1 device.

Reading List

With reading list feature in Windows 8.1, you can save an article to read it later. You can use this feature to collect a repository of information or you can quickly save article to use on your research project. This is quite useful feature for those who consumes lot of information and web content.

ReadingList_windows8.1

IE improvement

The updated version of IE in Windows 8.1 now supports unlimited tabs without hindering performance. So you can open 100s of tabs in one IE window and another 100s of it in a second IE window and you will not feel noticeable performance changes.

Better Skydrive Integration

Skydrive is installed by-default with Windows 8.1 and it looks like an integral part of Windows Explorer. With Windows 8.1 Microsoft has added Smart Files functionality. The Smart Files feature enables part of the files/folders to reside on the local storage and part on the skydrive there by leaving more space on local drive. With the new Skydrive app, now you can mark several files to make those available offline too.

SkyDrive_windows8.1

The new features in windows 8.1 seems promising, though not a completely new operating system but the changes it incorporates are quite welcome. Things like Start button and 50% split of screen are like a boon to existing users of Windows 8. Moreover the changes in User Interface, Control Panel, Better Skydrive integration etc are desirable. However Microsoft could have brought back the most sought after feature Start Menu with Windows 8.1 and as it did not happen, it seems like Start menu is completely gone from Windows  and we will not see it ever in any of the future version of Windows. All in all Windows 8.1 is a definite yes for the upgrade.

Categories
Mac Software

Features of Mac OS X Lion

Apple Inc. have again grabbed media attention with launch of new version of Mac; Mac OS X Lion. The launch must have left computer users across the globe in bemused condition; the ones with Mac must be thinking about upgrade and the ones with Windows must be thinking about switching camps. This post will give you a walk through of some of the exciting features of MAC OS X Lion and help you in making the final decision.

osx-lion-logo

This feline Mac version is loaded with more than 200 new features as confirmed by officials. Here are some of the features that one can fall in love at first sight.

Multi-Touch Gesture

Many Apple users are in an impression that sooner all Apple devices will be touch-friendly. New multi-touch gesture of Mac OS X Lion backs up their credo. This feature allows users to scroll webpage up and down by running off fingers in required direction on touchpad. Zooming in is possible by tapping twice on touch pad or using older method of pinch-and-zoom. It even allows three-finger gesture to quickly swipe between open applications.

MissionControl

As soon as you boot Mac OS X Lion, one can clearly see a dock where all the available applications are arranged in array. This array consists of unique application called Mission Control. Clicking on that icon will introduce you with all the applications or documents that are currently open. It provides you sophisticated view of open applications and prevents user from using keyboard combination of Ctrl + Tab; which however still accessible.

Mission Control

Multiple Desktops

Very few people must be unaware of multiple home screens available on Smartphones today; especially one that runs Android. In similar way, Mac OS X Lion users can create multiple desktops that can be personalized as one’s taste. For example, you can have one desktop dedicated to office work and one for your hobbies and so on. Desktop switching is available through Mission Control.

LaunchPad

Remember how all available applications are displayed on iPad or iPhone? The LaunchPad works in similar way by grouping available applications in an array. It can be considered as a sincere attempt to combine features of iOS with that of Mac.

apple_mac_os_x_launchpad

Full-Screen Applications

Mac has always been complete operating system available for computers. The only complaint that its regular users had was incompatibility of its applications to full screen mode. Mac OS X Lion has fixed the issue providing users with full screen access for applications. When you run app full screen, it shadows off background desktop and other running tools.

Auto Save and Versions

Are you familiar with the situation where you usually save work you are working on and close computer accidentally? Mac has made provision to help avoid regret after passing through such situations, thanks to the new Auto Save feature. It also creates new version of the document each time user opens it. One can easily review earlier version for comparison.

Verdict

Reviewing its astonishing features, upgrading to the newer Mac will surely be beneficial for current Mac users. If Windows users are tired of using Windows 7 and have no hopes from upcoming Windows 8, then switching to Mac OS X Lion can be good alternative. However, Lion is not available on disk but one who is willing to get it must download it from official website for $29.99. USB stick version of Mac OS X Lion is soon expected in market.

Categories
Windows

Fix for 100% CPU usage while notebook is using battery power

For quite a couple of days one of my friends had a very strange issue. When he was using his notebook in battery mode the notebook performance was very slow and CPU usage was continuously showing as 100%. As CPU was always busy at 100% every operation in the notebook was taking a hell lot of time. The friend of mine being a  novice computer user, he did not have any clue about what was going on. So I came as a rescue. With my analysis of his notebook I finally could find out that the issue was happening only when the notebook was using the battery power.

So i immediately found out that this has something to do with the Power Options and fiddle with the Power Options setting to finally fix the issue. So if you are experiencing a similar issue of 100% CPU usage by your Notebook, follow the steps below:

– Click on Start and Type Power Options in the search box in your Windows Vista/Windows 7 based PC.

– Hit enter to Open Power Options window.

– In Power Option, click on Chnage Plan setting for the current power plan you are using.

– Click on Change Advanced Power settings in the next window.

– A new window will open up.

– In this window, click on + sign near Processor Power management.

– Click on + sign near system cooling policy.

– Make sure the on battery settings for system cooling policy is set as Active. If it is passive, make it Active.

– Click on Apply and OK.


Skill level: Beginner

Categories
Internet Software

Convert Flash to HTML with Wallaby

Adobe has finally heard my plea and it’s a dream come true for me. I always wanted a way to convert the Flash (.fla) files to html for universal compatibility, and now I have an app that will help me to convert the .fla file to html5. The main benefit of converting the .fla to html is that we can view the product in any device that does not support flash run-time but supports html (which almost all the devices do). All this is possible with the help of an experimental technology developed by Adobe System called Wallaby currently available as a free download in Adobe labs. The biggest beneficiary of this will be the iOS users, like users of iPhone, iPad and iPod tocuh.


Wallaby converts Adobe Flash Professional (.fla) files into html5 format. Once converted into html5 version, this can be edited using any html editor and can be used with any device that supports html5. All standard web browsers now support html5. Just to add here, .fla is the raw file format for any flash application which is then converted (and compressed) to swf and is embedded on a web page. Wallaby does not have the ability to convert the .swf files to html5. So if you are thinking that you can now convert any embedded flash files to html5 and modify it according to your desire, you may be out of luck as there is no direct conversion possible. However you can use a swf decompiler tool to convert .swf to .fla and then use Wallaby to convert .fla to html5. Where wallaby is offered for free by Adobe, you might have to shell out a few buck to own a swf decompiler.

Wallaby offers immense possibility of usage of flash components in non-flash supported devices, as these can now leverage the power of html to have the same effects and functionality as flash. For example the flash based advertisement in mobile devices.

Things we must know before jumping to a conclusion:

1. It is only an early preview version, so offers very basic set of features. Many of the flash features are not supported under html5. The wallaby Release notes give a list of supported and unsupported features.

2. It is currently available as a 32 bit installer for Windows and Mac.

3. Wallaby can not convert .swf file to html5 directly. We need a 2 step process for that, which involves an application like swf decompiler.

4. At this time it uses Wekit css3 tags, so compatible with Webkit based browsers. This means the html5 output is not supported in Firefox or IE 9. As of now only supported browsers are Chrome(8.0 or later)  and Safari(5.0 or later).

If you are satisfied and want to give a try to Wallaby, you can download wallaby for free and see it in action, use it and submit any feature request and bugs.

My verdict is: Wallaby has immense potential to be a revolutionary product in future. Please share your opinion and experience with Wallaby & it’s future potential.

Categories
Tutorials Windows

Best Ways To Deal With Errors Related To Malware Infection

Malware programs, such as virus, trojan, adware, spyware, and other variants are not only a grave security threat, but they also cause various errors by interfering with other running processes and corrupting the registry. Symptoms of malware infection include:

1. Frequent random application and system errors.
2. Sluggish computer performance.
3. Frequent system freeze ups.
4. Frequent software and system crashes.

If your Windows PC is showing any or all of the above symptoms, chances are that your PC is infected. Take action before it’s too late – a severely infected PC may stop functioning completely, a situation from where the only retreat is formatting Windows.

I am going to elaborate on couple of malicious processes that may be running in your PC and how to remove the malwares effectively.

Brief description of the three most harmful processes

d.exe – This process is registered as a trojan and is spread over the Internet through email attachments. d.exe is designed to steal your personal information.

smss.exe – This process is also registered as a trojan and if present can causes havoc by causing frequent errors and performance related issues. Just like other trojans, smss.exe is effective in stealing a user’s confidential data that it passes to it’s home server.

wscntfy.exe – This malicious process creates numerous other processes, accesses user’s confidential data, and communicates with other computers by creating a TCP port on the infected computer. Immediately disable wscntfy.exe if found running and remove its associated malware.

Manual malware removal – not a recommended approach

By nature, malware programs create various harmful processes and register new DLLs on the system. Identifying all these processes and files manually is practically impossible. Besides creating new processes, malware also fills the Windows registry with various invalid and harmful entries. To ensure complete removal of malware, it is necessary that you remove all its associated files, processes, and registry entries.

How to remove malware effectively

Use a reliable antimalware tool to completely eradicate all threats from your computer. Before performing a malware scan complete the following two tasks:

– Update your antimalware software with the latest malware definitions and security updates.

– Disconnect your Windows PC from the Internet and from any other network to which it is attached.

After completing the above tasks, reboot Windows in Safe Mode and perform a malware scan on the entire system. To restart Windows in Safe Mode, perform the steps illustrated below:

1. Close all applications and restart your PC.

2. Press and hold the F8 key as Windows restarts.

3. Select the Safe Mode option in the Advanced Window Boot Option Menu.

4. Press Enter.

After you have removed the reported threats, use a professional registry maintenance tool to remove invalid and harmful entries that the malware may have added to your registry.

The methods described above are for newbie users, if you are an expert computer user, you may give the manual method of removal a try. However it involves meddling with registry and system files.

Categories
Tips & tricks Windows

How to use your Keyboard as a mouse

I was always wondering if we can use the computer without touching the mouse. Guess what, we can always do that. I have seen many people, they hardly touch mouse while working on their laptop or desktop. The way they use keyboard is by using the tab key, space bar and shortcut keys. But in reality the keys on the keyboard can be used to control the cursor just like we do with a mouse. The only requirement for this method is a keyboard with numeric keypad. So if you are thinking that you can use this method in your laptop, you need to check if it has a numeric keypad.

Do the following steps, for enabling your keyboard to perform the dual task of keyboard and mouse.

In Windows XP:

1. Go to Start > Control panel

2. Click on Switch to classic view from left

3. Double click on Accessibility options

4. On the new window, click on Mouse tab and check the option “Use Mouse keys”

5. Click on OK

– On the keyboard press the Num Lock key, it will make a beep sound.

Now press the keys on the numeric keypad and see how you can control the cursor with keyboard just like you do with mouse. If you want to make the cursor movement faster, on the step 4 click on settings button and make the chnages.

In Windows Vista/Windows 7:

The accessibility option has been changed to Ease of access center in Windows Vista and Windows 7. So we need to make changes in ease of access center. Do the following:

1. Click on Start and type “Ease of Access center” in the search box.

2. Hit Enter to open Ease of Access center.

3. Click on Make the keyboard easier to use.

4. Check the option ” Turn on Mouse keys“, for changing settings click on Setup mouse keys.

5. Click on OK.

Enjoy the fun….

If you would like to share any such tips related to computers, please do so through comments.

Categories
Tips & tricks Windows

Make your computer greet you with a message

A few lines of VB script code will let your computer greet you every time you login to it. This will look straight out of a sci-fi movie and this is so easy and cool. Your not-so-tech-savvy friends will not only be amazed at this but they will think you as a genius.  Use the steps provided below to let your computer welcome you with a personalized message.


1. Open Notepad and type the following lines of code (or copy the code below to a notepad) :

Dim speaks, speech
speaks="Hello Ajay, Welcome to your Computer. Please use me with care and Love."
Set speech=CreateObject("sapi.spvoice")
speech.Speak speaks

2. You can replace the text within quote (” “) in line 2 to any text you wish.

3. Save the file as speech.vbs . To do this, in notepad click on File > Save as,  select All Types for save as type and put file name as speech.vbs . Make sure the file is saved with .vbs extension and not like speech.vbs.txt . If it is correctly saved the file icon will change from a simple notepad icon to a VB script icon.

4. Now the required script file is ready. For the welcome message upon login, we need to load this file at start up. To do this we need to copy the file to start-up folder.

5. To copy to startup folder, click on Start > All programs and right click on Startup, select explore. This will open Startup folder in Windows Explorer. We need to paste the speech.vbs file inside this.

6. To verify that it is working correctly, restart your PC. If you hear your computer welcoming you, the trick has worked perfectly.

This trick has been personally tested by me in Windows XP SP3, Windows Vista and Windows 7 and works perfectly. Please share your experience on using this script.