Categories
Tips & tricks Webmaster

Use robots.txt to prevent website from being ripped

We all want to prevent our websites from being ripped. If you have a unique design the desire to prevent it from being duplicated is more. So we need to have an effective way of preventing rippers from getting an exact replica of our website. There are a plethora of website ripping applications like WinHTTrack or Webreaper which have been surfacing now a days and the rippers use these applications to create website replicas. They can use the replicated dump to create an exact clone of your website.

These rippers use bots to crawl the target websites and create static html version of all pages, copy the images, style sheets, JavaScript etc (Can not copy PHP or ASP files) and save them on the hard drive maintaining the directory structure and hyperlinks. Once the complete website is downloaded to your PC, you can use the website offline even if you are not connected to the Internet. These downloaded data can also be used to make an exact replica of your website. For static html based website the cloning becomes much easier. None of the webmaster will ever wish to allow anyone to rip their website but most of them wonder how to prevent such an operations.

The image below shows how the usage of an effective robots.txt file in our website root prevented WinHTTrack to copy our content and data:

We can use the robots.txt file to prevent the website ripper bots to crawl our website and subsequently the program will not be able to copy anything. We know that bots access to a website can be controlled using robots.txt which sits in the website root directory. Whenever we use a ripping program the bot used by the program will have to pass the check in robots.txt. If it finds that there the rule in robots.txt that disallows the bot, it will no longer be able to crawl the site which is a win-win situation for us. In robots.txt we have either an allow or a disallow rule, which looks like this:

User-agent: <User Agent name>
Disallow: /

User-agent: <User Agent name>
Allow: /

In the above examples the / indicates the root directory. It can be replaced with the directory path to which we wish to allow or deny the access. So when a bot goes through robots.txt and find itself under the Deny rule it will stop there itself and can no longer enter into the website.

This robots.txt method can be used to prevent email harvester, leechers or any such evil spirited applications from accessing your site. We have compiled a commonly used evil programs and created the deny rule for those programs. You can use the list below in your robots.txt file to create a preventive shield from the evil programs like WinHTTrack or Email Collector or Web Downloader. If you do not have a robots.txt file in your website root, create one with the following content or if you have one, you can just copy paste the content in your existing robots.txt file.

# This list is compiled by Techie Zone part of Qlogix Network.
User-agent: Teleport
Disallow: /
User-agent: TeleportPro
Disallow: /
User-agent: EmailCollector
Disallow: /
User-agent: EmailSiphon
Disallow: /
User-agent: WebBandit
Disallow: /
User-agent: WebZIP
Disallow: /
User-agent: WebReaper
Disallow: /
User-agent: WebStripper
Disallow: /
User-agent: Web Downloader
Disallow: /
User-agent: WebCopier
Disallow: /
User-agent: Offline Explorer Pro
Disallow: /
User-agent: HTTrack Website Copier
Disallow: /
User-agent: Offline Commander
Disallow: /
User-agent: Leech
Disallow: /
User-agent: WebSnake
Disallow: /
User-agent: BlackWidow
Disallow: /
User-agent: HTTP Weazel
Disallow: /

As this post is targeted for Webmasters and you are reading this post indicates that you are one of them, we would also suggest you to read the post on Increasing your website speed.
Categories
Internet Tips & tricks

How to type in your native language

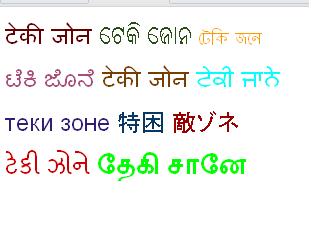
Are you wondering, how your friends send you scrap in Hindi/Oriya/Tamil or how they update their Facebook status message in Hindi/Oriya/Tamil. If you use Orkut (seen in some other Google application like blogger, Gmail) you would have seen that there is an option to type in your native Indian languages like Hindi/Bengali/Tamil etc. This is all possible because of a technology called Transliteration. There are various Transliteration provider, but the one provided by Google is very accurate and offers lot of fucntionalities. Transliteration converts the typed English characters into a native language based upon how it is spoken. It is not same as translation. So with the help of Transliteration tools you can phonetically type a word in English using a roman keyboard and it will be converted to the desired native language. So when you type Mera Bharat Mahaan, it will be converted to मेरा भारत महान.

Google Transliteration tools are available in different formats like Transliteration Bookmarklet, Transliteration IME and a dedicated website.

The Goolge Transliteration website is a dedicated website by Google which can be used to type in 24 supported language like Amharic, Arabic, Bengali, Chinese, Greek, Gujrati, Hebrew, Hindi, Japanese, Kannada, Malayalam, Marathi, Nepali, Oriya, Persian, Punjabi, Russian, Sanskrit, Serbian, Sinhalese, Tamil, Telugu, Tigrinya and Urdu. Using this website you can type whatever you want and then copy the transliterated version of the text and paste it wherever you wish. I selected Hindi from the drop down and typed my name in English using my normal keyboard and it got converted to अजय कुमार मेहेर.


Google Transliteration Bookmarklet is another way to use the transliteration service in any website with a text box to type. This bookmarklet is a simple piece of code which resides in the browser and provides you the option to chat, compose an email, update Facebook status or send scrap in your native language. Google Transliteration Bookmarklets are available in 19 different languages – Amharic, Arabic, Bengali, Greek, Gujarati, Hindi, Kannada, Malayalam, Marathi, Nepali, Persian, Punjabi, Russian, Sanskrit, Serbian, Tamil, Telugu, Tigrinya and Urdu. In order to use the Transliteration bookmarklet fature, you need to drag the appropriate bookmarklet to your browser’s bookmark toolbar.  For example to type in Hindi Drag the following bookmarklet to your Bookmark toolbar.

Type in Hindi

Transliteration IME offered by google is an Input Method Editor(IME) a very small program which allows to enter text in your native language using a standard Roman keyboard. Google Transliteration IME is available for 22 different languages – Amharic, Arabic, Bengali, Farsi, Greek, Gujarati, Hebrew, Hindi, Kannada, Malayalam, Marathi, Nepali, Oriya, Punjabi, Russian, Sanskrit, Serbian, Sinhalese, Tamil, Telugu, Tigrinya and Urdu. The Google IME provides the most advanced features and lot of customization. We ned to install a separate IME for each language. Once installed, it will show a status window at the bottom right corner of desktop. It has options to change language as well as settings option. This page provides further information about the Google transliteration IME.

Categories
Tips & tricks Windows

How to use your Keyboard as a mouse

I was always wondering if we can use the computer without touching the mouse. Guess what, we can always do that. I have seen many people, they hardly touch mouse while working on their laptop or desktop. The way they use keyboard is by using the tab key, space bar and shortcut keys. But in reality the keys on the keyboard can be used to control the cursor just like we do with a mouse. The only requirement for this method is a keyboard with numeric keypad. So if you are thinking that you can use this method in your laptop, you need to check if it has a numeric keypad.

Do the following steps, for enabling your keyboard to perform the dual task of keyboard and mouse.

In Windows XP:

1. Go to Start > Control panel

2. Click on Switch to classic view from left

3. Double click on Accessibility options

4. On the new window, click on Mouse tab and check the option “Use Mouse keys”

5. Click on OK

– On the keyboard press the Num Lock key, it will make a beep sound.

Now press the keys on the numeric keypad and see how you can control the cursor with keyboard just like you do with mouse. If you want to make the cursor movement faster, on the step 4 click on settings button and make the chnages.

In Windows Vista/Windows 7:

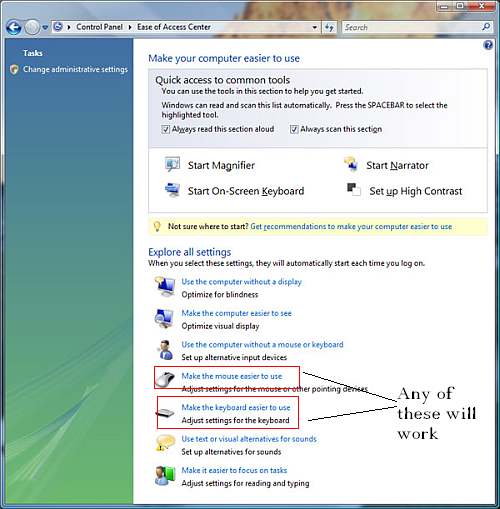
The accessibility option has been changed to Ease of access center in Windows Vista and Windows 7. So we need to make changes in ease of access center. Do the following:

1. Click on Start and type “Ease of Access center” in the search box.

2. Hit Enter to open Ease of Access center.

3. Click on Make the keyboard easier to use.

4. Check the option ” Turn on Mouse keys“, for changing settings click on Setup mouse keys.

5. Click on OK.

Enjoy the fun….

If you would like to share any such tips related to computers, please do so through comments.

Categories
Tips & tricks Windows

Make your computer greet you with a message

A few lines of VB script code will let your computer greet you every time you login to it. This will look straight out of a sci-fi movie and this is so easy and cool. Your not-so-tech-savvy friends will not only be amazed at this but they will think you as a genius.  Use the steps provided below to let your computer welcome you with a personalized message.


1. Open Notepad and type the following lines of code (or copy the code below to a notepad) :

Dim speaks, speech
speaks="Hello Ajay, Welcome to your Computer. Please use me with care and Love."
Set speech=CreateObject("sapi.spvoice")
speech.Speak speaks

2. You can replace the text within quote (” “) in line 2 to any text you wish.

3. Save the file as speech.vbs . To do this, in notepad click on File > Save as,  select All Types for save as type and put file name as speech.vbs . Make sure the file is saved with .vbs extension and not like speech.vbs.txt . If it is correctly saved the file icon will change from a simple notepad icon to a VB script icon.

4. Now the required script file is ready. For the welcome message upon login, we need to load this file at start up. To do this we need to copy the file to start-up folder.

5. To copy to startup folder, click on Start > All programs and right click on Startup, select explore. This will open Startup folder in Windows Explorer. We need to paste the speech.vbs file inside this.

6. To verify that it is working correctly, restart your PC. If you hear your computer welcoming you, the trick has worked perfectly.

This trick has been personally tested by me in Windows XP SP3, Windows Vista and Windows 7 and works perfectly. Please share your experience on using this script.

Categories
Tips & tricks

How to fix Audio & Video out of sync issue using VLC player

Many of the time when we download a video clip or a movie, we find that the audio does not sync with the lips movement of the characters or the audio and video does not match. This kind of video clip/movie is very frustrating to watch.  However we can use VLC Player to fix such issue and make our video clip play in sync with the audio. And this method of using the VLC player is by far the easiest and cheapest method to fix an unsync video during playtime.

Solution:

Download and install VLC media player (if you do not have it). It is Free.

– Open the downloaded Video Clip in VLC. Right click on the video clip and select Open With..Select VLC from the list.

– If the Audio comes before Video, we need to slow the audio, so press fn+K key (On laptop). Each combi keystroke will reduce the audio speed by 50ms. So keep dong it until you see the video and audio are sync.

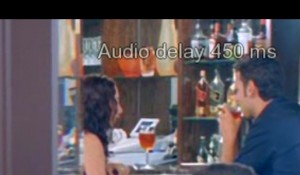
– If the Audio comes after the video, we need to make the audio fast, so press fn + J (On laptop) key. When you invoke the shortkey the screen will show the delay amount as shown in the below image:

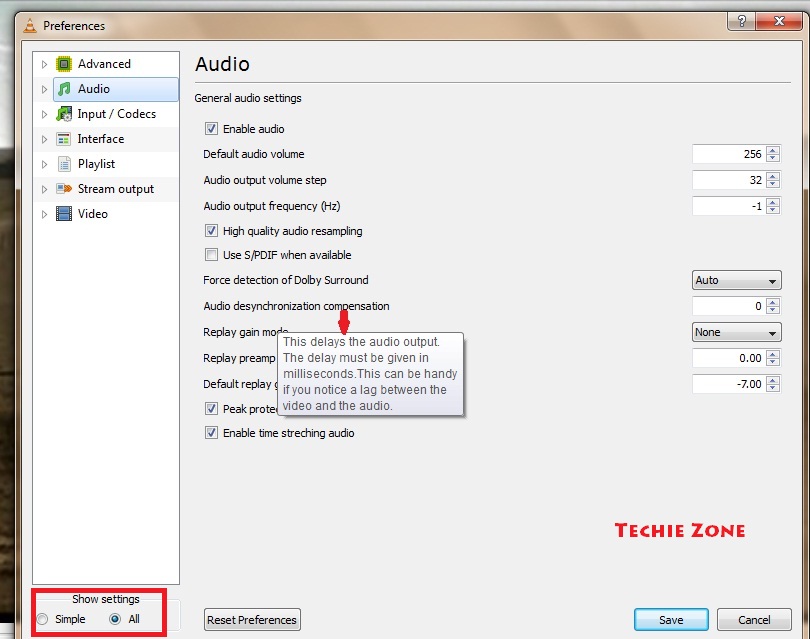
If you have a desktop, you can try the Ctrl + K and Ctrl + J key respectively for the same result. If the shortkey key does not work , we can change the settings from preferences as follows:

– Open VLC player and click on Tools > Preferences

– On preferences window, click on All under Show settings, Select Audio from left.

– On the right pane look for the option Audio desynchronization compensation

Put a negative or positive value in the box towards right…depending upon the situation. See the image below:

Majority of the audio and video out of sync issue are because of improper encoding format while ripping the video. The solution has been tested with downloaded video clip, so I am not sure if it will work with such issue in a DVD video. If you have issue with a newly purchased DVD than Microsoft has a nicely explained solution in it’s knowledge base.

I have not been able to test this in Desktop, so please put your comment, how you have been able to correct this in desktop..