Categories
Browsers Internet Product release Tech News

Firefox 4 Release date and Features walkthrough

An Update to the post has been provided at the bottom. Mozilla took down the ftp download link.

Finally the wait is going to be over in a couple of hours when the much awaited Firefox 4.0 will be released on 22nd March 2011. All thanks to Microsoft for releasing IE 9. The war of the browser has intensified. As IE 9 has been released last week and people are quite gung-ho about the new Internet explorer, Mozilla could not have delayed the release of the final version of Firefox 4. So the decision came at the right time.

The Release Candidate (RC) version of a program can be regarded as the final version when functionality or design is concerned. So the final version of Firefox 4 will sport the same look and offer same functionality as the RC version. So let’s have a quick look at the features and improvements we are going to see in Firefox 4.

– User Interface

> Menu Bar

The menu bar is by default hidden in Windows Vista and Windows 7. This is to give it a more consistent look with the User Interface of the OS. Instead of the menu bar you can see a new Firefox button in orange color at the top left corner. (It mimics the Opera).

> Tabs

The tab position has been moved to the top of the Window. This is to give more visual priority to the tabs. But while switching to Firefox 4, you might feel it bit awkward especially if you are regular Firefox user. After I switched to Firefox 4, I have looked for the tabs in it’s old location because of the habit :).

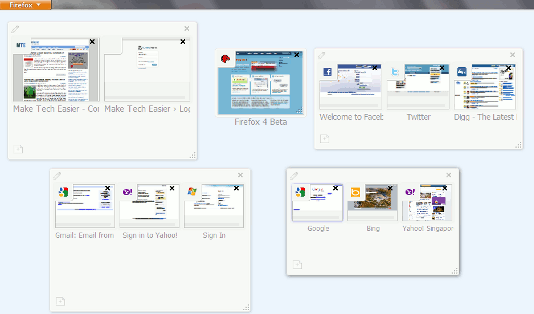
Firefox Panorama is another improvements which organizes tabs into groups and lets you perform various operations on tab groups.

Switch to Tabs is another feature in Firefox 4 which lets you switch to an already opened tab when you type the same website name.

App Tab feature in Firefox 4 lets you keep the always open sites like Web Mail, Facebook etc a permanent position on the browser. So you do not need to have a separate tab for those. Just right click on the opened Tab and Select Make into App Tab and you are done.

> Stop/Refresh/Go button

The stop, Refresh and Go button has been combined into one and placed at the right of address bar. The buttons appearance changes dynamically depending upon the page status.

Overall the improvement is user Interface gives Firefox a much need look and removes lot of clutter present in older versions.

– Firefox Sync:

The Firefox Sync is an Add-on released for earlier version of Firefox. But With Firefox 4 this feature is built-in. Firefox Sync helps in  synchronizing bookmarks, browsing history, passwords, preferences  and last 25 opened tabs across multiple computers. The user data are synced to Mozilla seever and kept there in an encrypted format and it is synced to PCs you use.

– New Add-on Manager

Firefox 4 sports a brand new Add-on manager window. This new Add-on manager gives an easier way to manage Addons and personalizing the browsing. The new add-on manager has 4 categories viz. get Add-ons, Extensions, Appearance and Plugins.

Apart from the above visual changes, there are a lot of changes as given below in the core as well as security improvements in Firefox 4 which undoubtedly makes Firefox the best browser.

– Complete CSS3 and HTML 5 support

– Supports WebM video standard so you can watch HD quality video and 3D graphics support through Web GL.

– Integrate Multi Touch support for Windows 7.

– Support for different platform like Windows, mac and Linux.

– Improved security through HSTS (Http Strict Transport Security)

– Firefox 4 is the fastest browser in handling JavaScript, thanks to JagerMonkey JavaScript engine.

-Download

The Firefox RC download link is available at the Mozilla Firefox web page. However it says it is the RC 2 release and the file name is Firefox Setup 4.0 RC2.exe however the FTP location of Mozilla gives this file Firefox Setup 4.0.exe

When I installed the file from FTP location it still says Mozilla Firefox 4 like the RC version when you click on Help > About. It may happen that Mozilla has already kept the final version in the ftp as they are getting ready for the release.

UPDATE:

After many bloggers published the news of the presence of final version of Firefox 4.0  in Mozilla FTP repository, they have taken down the download link and now the link says “Page Cannot be displayed”. I noticed this at IST 2.40AM.

UPDATE:

The link has not actually been taken down, but gives a permission denied error when tryng to downlaod drectly. SO go to the following link and right click on Firefox Setup 4.0.exe and selct Save link as ftp://ftp.mozilla.org/pub/mozilla.org/firefox/releases/4.0/win32/en-US/

Categories
Internet

You can block unwanted search result in Google search

Yes that’s true. Google is known for pioneering new things, and this time they have leveraged some power to end users to control how the search result appears to them. In other words now an individual searcher has the ability to let a website appear in his/her search result. That means if you are nagged by irrelevant websites appearing in your search result, you can just block those sites and from next time those sites will not appear in your search result for that keyword search as well as that domain is altogether blocked from your search result. This is obviously a welcome move from Google. And low quality sites will get blocked/hidden by many experienced searchers.

Overview of the feature

With the latest set of improvements in Google search, it is now possible to control the appearance of websites in the search result. So when you are searching for something in Google and you clicked on a result but found that the resulting website is irrelevant to your search, you can block that website and it will not appear in your future search result.

This feature is currently available for search result in google.com in English for users with Chrome 9+, Firefox 3.5+ and Internet Explorer 8+. So if you are using an outdated browser then I am sorry, you will not have any luck.

How this works?

– Go to google.com and not any other Google domains like google.co.in

– Search for something and on the result page click on any search result, now go back to the search result page.

– You will see a new link (beside cached, similar) appearing near the search result where you clicked.

– Hover the mouse over the new link (block all example.com results) and it will tell you Not helpful, you can block example.com search result when you are signed in to search). Click on that block all example.com results and t will vanish with a nice funky effect from your search result page. And it will give a notification saying we will not show you results from example.com again with a Link to Manage Blocked sites and Undo the action.

– Now try to search for the same query again and you will see the particular website is no longer appearing in the search result. However at the bottom of the search page you will see an alert like you blocked X results from  example.com

The above mentioned things will work irrespective of you logged in to your Google account. However when you are signed in, then only the block for the website/domain will be confirmed and you will be able to manage the domain.

Note: In the year 2005 Google search introduced a feature called remove result but it was taken down before it was rolled out to every one. (Thanks Alex Chitu for this info). This feature has been announced by Google blog

Categories
Product release Wordpress

JetPack lets you get wordpress.com features in your self hosted wordpress

Without an iota of doubt, I would like to say that WordPress is the best and most popular blogging platform. This comes in 2 flavors, One is the self hosted version of WordPress, which is released by Automattic under GNU-GPL license. The other one is WordPress.com, which provides a free as well as paid (premium) platform hosted iin cloud to publish your blog. So even if you do not have a domain name or web server you can still create your blog as a subdomain of WordPress.com and publish it.

There are certain extremely good features and benefits that a WordPress.com users enjoys, those until now were officially not available in self hosted version of WordPress. Though some of the features like WordPress.com stats were made available in self-hosted version with the help of specialized plugins. According to the founder of Automattic & man behind WordPress Matt, it was his dream to provide feature parity between WordPress.com and self-hosted WordPress. And finally his dream has turned into reality in the form of a plugin called JetPack , which gives you all the features in WordPress.com that we always wanted in our self hosted version of WordPress.

With the launch of the first version of JetPack, following 8 features (cloud goodies) of WordPress.com will be activated in your self-hosted version of WordPress when you activate JetPack plugin. JetPack connects to WordPress.com and enables the awesome features in your self hosted version of WordPress.

1. WordPress.com Stats : It provides a simple and concise statistics for yur website without any additional load on your server.

2. Twitter Widget: If your theme supports widget, it will show latest tweets from a twitter user.

3. Gravatar Hovercards: It is a cool feature & I always wanted to have in my website. This will show a pop-up business card of user’s gravatar profile when you hover the mouse over their name.

4. Wp.me shortlinks: The default URL shortening service from Automattic. All your posts & pages will be able to sue this for better sharing in micro blogging platform like twitter.

5. Sharedaddy: It will make the Sharing of your posts easier over the social networks & social bookmarking sites

6. Latex: is the famous markup language to insert mathematical equations inside your post and pages.

7. After the deadline: This a spelling, grammar and style checker with built-in AI.

8. Shortcode Embeds: Add movies, images, flash etc into your posts & pages with single line of code.

The list does not end here. In the coming version of the plugin, expect to see some more uberly cool features of WordPress.com.

If you are hosted with partner hosts of Automattic like Bluehost, DreamHost, Go Daddy, HostGator, Media Temple, and Network Solutions then the one click installation of WordPress available with them is JetPack enabled.  That means when you install WordPress through one click install, you do not need to install the JetPack plugin separately.

Download, Install & Pre-requisite:

1. Please note that Jetpack will work only with WordPress 3.0.5 and later version, you also need a WordPress.com account (if you do not have one you can create so during the setup process. If you meet these 2 requirements,

2. Visit the JetPack website to download the plugin.

3. Unpack and upload it to the plugins directory.

4. Log in to WordPress admin area and Activate the JetPack plugin. Upon Activation, it will show you a message to connect to WordPress.com. Click on the (see the image below)

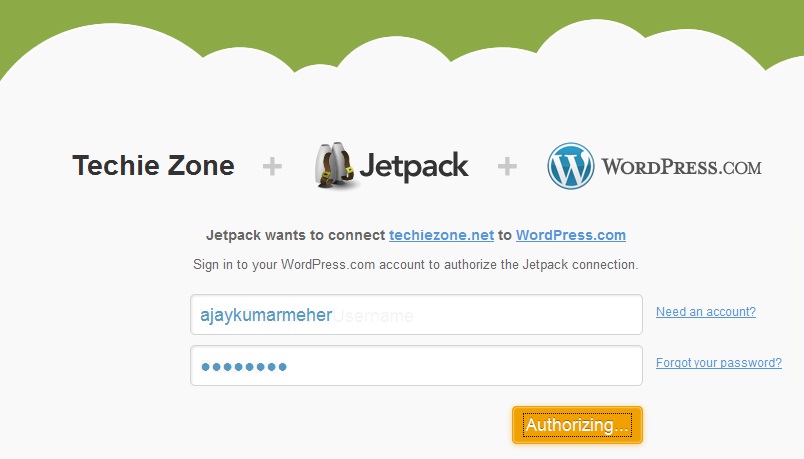
Jetpack actvation alert5. It will take you to an authorization page as shown in image below. Put your WordPress.com user name and Password and click on Authorize. If you do not have a WordPress.com account, you can create one here by clicking on need an account.

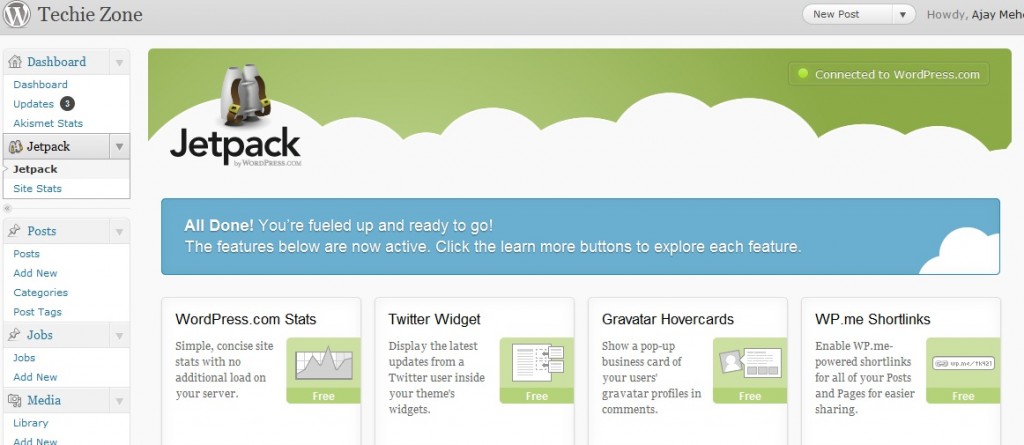
6. Upon successful authorization, you will be redirected back to your WordPress admin area and jetpack setting page will be shown. This looks like the one in the below image:

JetPack Dashboard

From here, you can customize the required features. JetPack not only connects you to WordPress.com  to provide awesome features, but also provides you the convenience of not installing several plugins.

Categories
Tutorials Windows

Best Ways To Deal With Errors Related To Malware Infection

Malware programs, such as virus, trojan, adware, spyware, and other variants are not only a grave security threat, but they also cause various errors by interfering with other running processes and corrupting the registry. Symptoms of malware infection include:

1. Frequent random application and system errors.
2. Sluggish computer performance.
3. Frequent system freeze ups.
4. Frequent software and system crashes.

If your Windows PC is showing any or all of the above symptoms, chances are that your PC is infected. Take action before it’s too late – a severely infected PC may stop functioning completely, a situation from where the only retreat is formatting Windows.

I am going to elaborate on couple of malicious processes that may be running in your PC and how to remove the malwares effectively.

Brief description of the three most harmful processes

d.exe – This process is registered as a trojan and is spread over the Internet through email attachments. d.exe is designed to steal your personal information.

smss.exe – This process is also registered as a trojan and if present can causes havoc by causing frequent errors and performance related issues. Just like other trojans, smss.exe is effective in stealing a user’s confidential data that it passes to it’s home server.

wscntfy.exe – This malicious process creates numerous other processes, accesses user’s confidential data, and communicates with other computers by creating a TCP port on the infected computer. Immediately disable wscntfy.exe if found running and remove its associated malware.

Manual malware removal – not a recommended approach

By nature, malware programs create various harmful processes and register new DLLs on the system. Identifying all these processes and files manually is practically impossible. Besides creating new processes, malware also fills the Windows registry with various invalid and harmful entries. To ensure complete removal of malware, it is necessary that you remove all its associated files, processes, and registry entries.

How to remove malware effectively

Use a reliable antimalware tool to completely eradicate all threats from your computer. Before performing a malware scan complete the following two tasks:

– Update your antimalware software with the latest malware definitions and security updates.

– Disconnect your Windows PC from the Internet and from any other network to which it is attached.

After completing the above tasks, reboot Windows in Safe Mode and perform a malware scan on the entire system. To restart Windows in Safe Mode, perform the steps illustrated below:

1. Close all applications and restart your PC.

2. Press and hold the F8 key as Windows restarts.

3. Select the Safe Mode option in the Advanced Window Boot Option Menu.

4. Press Enter.

After you have removed the reported threats, use a professional registry maintenance tool to remove invalid and harmful entries that the malware may have added to your registry.

The methods described above are for newbie users, if you are an expert computer user, you may give the manual method of removal a try. However it involves meddling with registry and system files.

Categories
Tips & tricks Windows

How to use your Keyboard as a mouse

I was always wondering if we can use the computer without touching the mouse. Guess what, we can always do that. I have seen many people, they hardly touch mouse while working on their laptop or desktop. The way they use keyboard is by using the tab key, space bar and shortcut keys. But in reality the keys on the keyboard can be used to control the cursor just like we do with a mouse. The only requirement for this method is a keyboard with numeric keypad. So if you are thinking that you can use this method in your laptop, you need to check if it has a numeric keypad.

Do the following steps, for enabling your keyboard to perform the dual task of keyboard and mouse.

In Windows XP:

1. Go to Start > Control panel

2. Click on Switch to classic view from left

3. Double click on Accessibility options

4. On the new window, click on Mouse tab and check the option “Use Mouse keys”

5. Click on OK

– On the keyboard press the Num Lock key, it will make a beep sound.

Now press the keys on the numeric keypad and see how you can control the cursor with keyboard just like you do with mouse. If you want to make the cursor movement faster, on the step 4 click on settings button and make the chnages.

In Windows Vista/Windows 7:

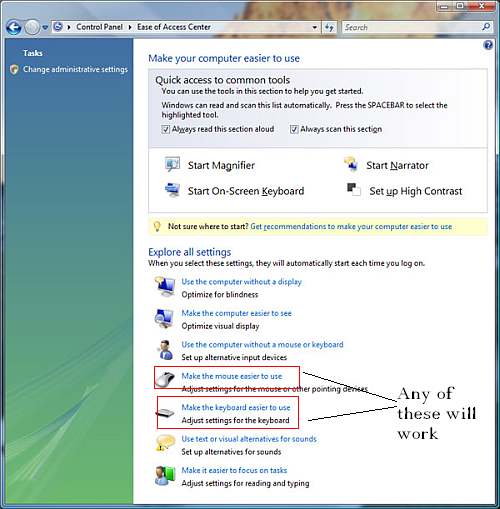
The accessibility option has been changed to Ease of access center in Windows Vista and Windows 7. So we need to make changes in ease of access center. Do the following:

1. Click on Start and type “Ease of Access center” in the search box.

2. Hit Enter to open Ease of Access center.

3. Click on Make the keyboard easier to use.

4. Check the option ” Turn on Mouse keys“, for changing settings click on Setup mouse keys.

5. Click on OK.

Enjoy the fun….

If you would like to share any such tips related to computers, please do so through comments.

Categories
Tips & tricks Windows

Make your computer greet you with a message

A few lines of VB script code will let your computer greet you every time you login to it. This will look straight out of a sci-fi movie and this is so easy and cool. Your not-so-tech-savvy friends will not only be amazed at this but they will think you as a genius.  Use the steps provided below to let your computer welcome you with a personalized message.


1. Open Notepad and type the following lines of code (or copy the code below to a notepad) :

Dim speaks, speech
speaks="Hello Ajay, Welcome to your Computer. Please use me with care and Love."
Set speech=CreateObject("sapi.spvoice")
speech.Speak speaks

2. You can replace the text within quote (” “) in line 2 to any text you wish.

3. Save the file as speech.vbs . To do this, in notepad click on File > Save as,  select All Types for save as type and put file name as speech.vbs . Make sure the file is saved with .vbs extension and not like speech.vbs.txt . If it is correctly saved the file icon will change from a simple notepad icon to a VB script icon.

4. Now the required script file is ready. For the welcome message upon login, we need to load this file at start up. To do this we need to copy the file to start-up folder.

5. To copy to startup folder, click on Start > All programs and right click on Startup, select explore. This will open Startup folder in Windows Explorer. We need to paste the speech.vbs file inside this.

6. To verify that it is working correctly, restart your PC. If you hear your computer welcoming you, the trick has worked perfectly.

This trick has been personally tested by me in Windows XP SP3, Windows Vista and Windows 7 and works perfectly. Please share your experience on using this script.

Categories
Tech News

Google Calling all Junior Scientists Huge scholarship on Offer

The almighty Google is looking for the brightest and the best young scientist around the world to take part in one of it’s kind of a science fair called Google Science Fair. Every student in the age group of 13-18 yrs are eligible to participate either as an individual contestant or as a group.

How to Enter

The application process is rather simple.

– You need to have a google account. If you do not have one, Create a Google Account.

– Complete the Google Science Fair sign up form. After you submit the form, you will see an important link on the confirmation page. This link will create the Google project submission site where you will post your science fair project details.

– If you have signed up but can’t find the link,  Click here to create your Google project submission site.

– Plan your science project, conduct your experiment, and write up your results. – Complete all of the sections of your Google project submission site (see sample project submission site).

– Create either a two-minute video or 20-slide presentation giving an overview of your project and embed it on the Summary page of your project submission. A video or presentation is required to enter. – When your project site is done, make sure to submit it via this form by 4 April 2011.

Notes: * The last date for submission is 4th April 2011.

* The entries must be submitted only in English.

* There are huge amount of scholarship, national geographic expedition as well as gadgets and goodies for the winner.

Categories
How to

How to fix: Windows 7 sidebar gadgets not working

X73W524MRTB2

This post is based upon my personal experience while solving the issue with my brother’s laptop. Yesterday my brother called me up saying that the clock, CPU meter etc that appear on right side of desktop is no longer working. I got to know that he is speaking about the sidebar gadgets. I asked him to start a remote session using our favorite client Team Viewer. While working remotely on his laptop, I had some interesting findings, which I will describe in the next paragraph.

First of all let me tell that Sidebar was introduced in Windows Vista and it holds mini applications called gadgets. These gadgets are very useful as they provide useful information like time, usage of processor/RAM etc. There are many gadgets available which serve different purpose. The technology behind sidebar gadgets in Windows Vista and Windows 7 are slightly different. in Windows Vista this was independent of User Account Control (UAC) but in Windows 7, it is tightly tied to UAC. So if you have disabled the UAC ( to prevent those unwanted pop ups about permission for each and every task you perform) than the sidebar gadgets will no longer work.  And this was the issue in case of my brother’s laptop.

To fix this issue, we can either enable the UAC which is the easiest method or do some hardcore registry editing steps that will enable the sidebar with UAC still disabled. So let’s discuss about the second method. The following steps will help you in fixing the issue:

As the following steps involve modifying the registry, we strongly suggest you to backup the registry. Techie Zone is not responsible for any issues caused to your computer after following the steps. Read our disclaimer for further details.

– Click on Start > Type regedit in the search box and hit Enter. It will open Registry editor.

– In Registry editor Navigate to HKEY_LOCAL_MACHINE\SOFTWARE\Microsoft\Windows\CurrentVersion\Sidebar\Settings

In the right pane, double click on DWORD value AllowElevatedProcess and set the value to 1.

– If the DWORD value is not present, right click on the right pane and click on New > DWORD

– Create a new DWORD called AllowElevatedProcess

– Set the value of the new DWORD to 1

– Close the registry editor.

If you are not confident enough to perform the steps, you can download the following ready made registry file:

AllowElevatedProcess registry tweak

Save the above file (AllowElevatedProcess.reg) on desktop, Right click on AllowElevatedProcess.reg and select merge. This will fix the issue and does not require a restart.

If you have such tips to share, please let us know and we will be glad to publish it.


In the right pane, double click on DWORD value AllowElevatedProcess

Categories
Tips & tricks

How to fix Audio & Video out of sync issue using VLC player

Many of the time when we download a video clip or a movie, we find that the audio does not sync with the lips movement of the characters or the audio and video does not match. This kind of video clip/movie is very frustrating to watch.  However we can use VLC Player to fix such issue and make our video clip play in sync with the audio. And this method of using the VLC player is by far the easiest and cheapest method to fix an unsync video during playtime.

Solution:

Download and install VLC media player (if you do not have it). It is Free.

– Open the downloaded Video Clip in VLC. Right click on the video clip and select Open With..Select VLC from the list.

– If the Audio comes before Video, we need to slow the audio, so press fn+K key (On laptop). Each combi keystroke will reduce the audio speed by 50ms. So keep dong it until you see the video and audio are sync.

– If the Audio comes after the video, we need to make the audio fast, so press fn + J (On laptop) key. When you invoke the shortkey the screen will show the delay amount as shown in the below image:

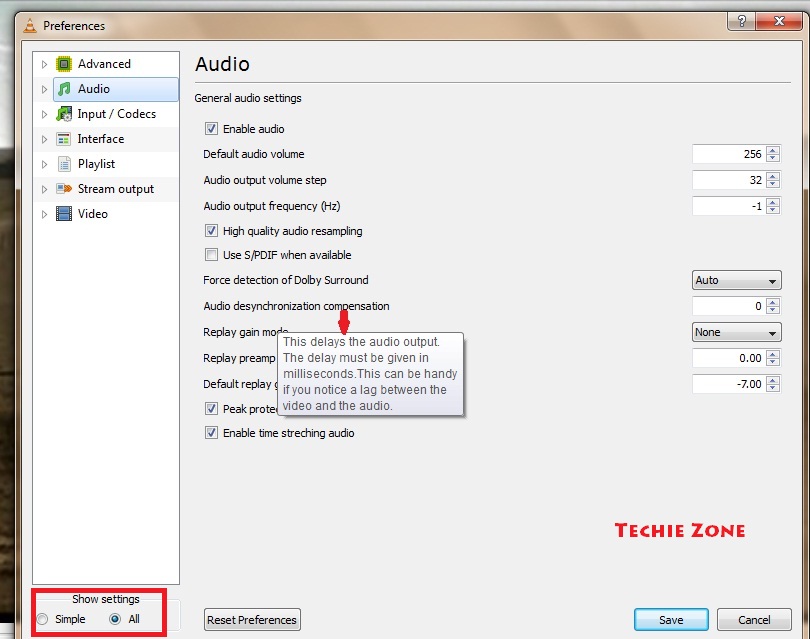
If you have a desktop, you can try the Ctrl + K and Ctrl + J key respectively for the same result. If the shortkey key does not work , we can change the settings from preferences as follows:

– Open VLC player and click on Tools > Preferences

– On preferences window, click on All under Show settings, Select Audio from left.

– On the right pane look for the option Audio desynchronization compensation

Put a negative or positive value in the box towards right…depending upon the situation. See the image below:

Majority of the audio and video out of sync issue are because of improper encoding format while ripping the video. The solution has been tested with downloaded video clip, so I am not sure if it will work with such issue in a DVD video. If you have issue with a newly purchased DVD than Microsoft has a nicely explained solution in it’s knowledge base.

I have not been able to test this in Desktop, so please put your comment, how you have been able to correct this in desktop..

Categories
Windows

How to easily convert Microsoft Office Documents to PDF

Do you have a Word document or a Power Point presentation and you wish it to be in pdf format? Or you ever wonder how those pdf documents are made? No worry at all, as you can have any of your Word document or Power Point presentation or an Excel spreadsheet (supports upto 8 MS Office files) in pdf format right from your Office 2007. There are various other methods to convert a Word document to pdf like using a converter program or using a virtual printer like Primo pdf or cute PDf writer. But none of them offer the flexibility offered by Microsoft Office 2007. It is the easiest method of converting your document to pdf in just one click. If you wish you can even save your document as XPS (Another pdf like document standard called XML Paper Specification developed by Microsoft and introduced with Windows Vista)

By-default this feature will not be available in Office 2007. We need to download add-ons from Microsoft Download center and install it to get this functionality working.

Installation & Usage:

Depending upon what functionality you want to add, download the appropriate add-ons by clicking one of the following link:

For Save as PDF or XPS For save AS PDF only For Save as XPS only

After download, double click on the file and follow the onscreen instruction to install the program.

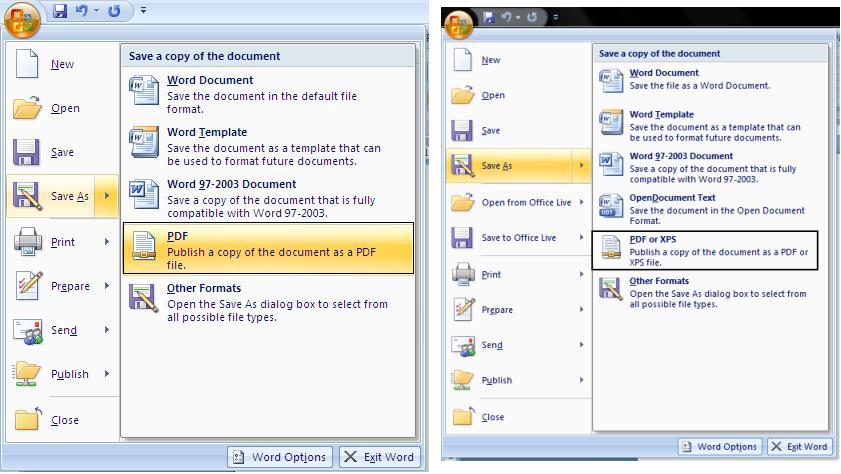
Once this add-on is installed, to use it, open any document and simply click on Save As or Publish To option from File menu.

Removal Process:

In case you, no longer want to use this functionality, you can always uninstall it from your computer without affecting your Office installation. Do the following for removal:

– Go to Control Panel.

– Double-click on Programs and features or Add/remove Programs.

– In the list of currently installed programs, select Microsoft Save as PDF or XPS Add-in for 2007 Microsoft Office programs and then click Remove or Add/Remove. If a dialog box appears, follow the instructions to remove the program.

Techie Zone will keep on providing such tutorials on a daily basis. So keep visiting.