Since the time Google announced that the Page Load time also plays an important role in ranking a web site, all of us are craving for a faster site load to get the SERP. But WordPress is notoriously famous for giving slow performance as it dynamically generates every posts and pages using database queries. Usage of various plugins for customization of a WordPress based site adds to this to make the site more slower. It does not mean that we will abandon WordPress and embrace another blogging platform. WordPress is the best blogging platform and have millions of good things to offer. There are various ways to make the WordPress based site faster.
Using a good performance optimization plugin is one of the best way to make your site faster. When we think of performance optimization plugin 2 things come to our mind e.g W3 Total cache and WP Super cache. For a week or so I have been testing both the plugins in various websites and in all my tests W3 total cache has far exceeded WP Super cache in all aspects. The Page speed and Yslow scores are higher in all my tests while using W3 total cache. Only problem with W3 total cache is that, it has huge customization option and if not done properly will result into a negative effect. Hence in this tutorial, I will take you through a step by step configuration of W3 Total cache.
Before you activate W3 Total cache, we suggest you to check the PageSpeed and Yslow score of your website using GTMetrix. Make a note of the scores and see the differences in score after you finish configuring the plugin.
Installing W3 Total Cache
First of all uninstall/deactivate any performance optimization (caching) plugins like WP Super cache. This is 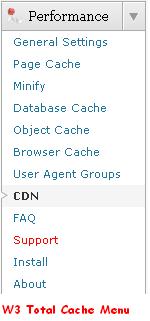 mandatory to avoid any conflict in further steps. When you are sure there is no caching plugin running, Download W3 Total Cache for free from WordPress Plugin repository and save it on the desktop. Unzip the archive and use your favorite ftp program to upload it to the wp-content/plugins folder of the website where you want to configure W3 total cache. Before we activate and proceed with the configuration, we will need to make the wp-content folder writable. So using the FTP client, change permission of wp-content folder to 777 till we are done with set up. Now go to WordPress Admin panel and click on plugins, look for W3 total cache in the list of inactive plugins and activate it. Upon activation a new menu item as shown in figure will appear in Admin panel.
This plugin has a nice notification system, which will issue notification messages whenever some action needs to be performed.
General Settings:
The first step in the configuration process is the general setting. Click on the General settings from the new Performance menu that appear. You will be presented with the General settings page.
The General settings is an overview of different features available in W3 total cache. This will show settings for Page Cache, Minify, Database Cache, Object Cache, Content Delivery Network (CDN) and Browser Cache. From here we can globally enable or disable a feature available in W3 Total Cache. By Default the W3 Total cache runs in preview mode. In that mode any changes we make in the plug-in will not be applicable to the live site. So our very fast job is to enable the plugin for the live site by disabling the Preview mode, hence the General settings page will look like this:
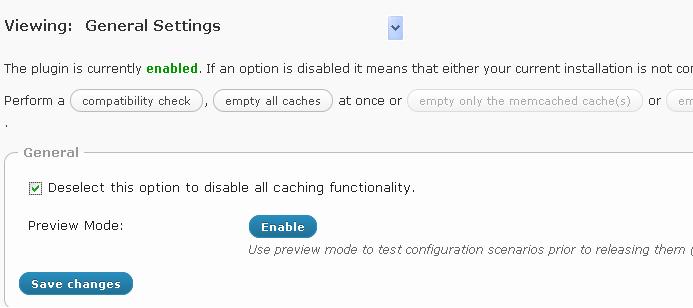 If you disable any of the features under general settings the option “Deselect this option to disable all caching functionality” will be automatically unchecked. So if you disable any feature and see that the option is unchecked, do not worry about it. It looks like a wrong reference. While testing various options I found that the Minify settings from W3 total cache can be disabled and we can use another plugin called Wp-Minify for the best minification. So my suggestion for General settings is
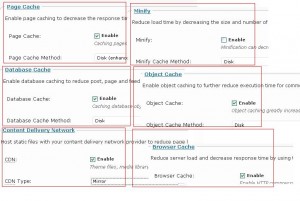 Page Cache: Enable and the method is Disk (enhanced)
Minify: Disable
Database cache: Enable and the method is Disk
Object cache: Enable and the method is Disk
Content Delivery Network: Enable and the CDN type depends upon what kind of CDN you use.
Browser Cache: Enable.
Once you are sure the general settings look like the above, we can proceed with the configuration of individual features.
Page Cache Setting:
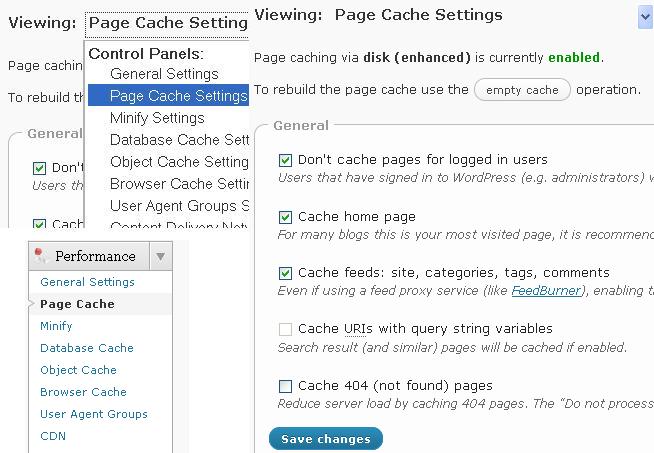
Click on the drop down that reads general setting and select Page cache or click on Page cache from the Performance menu on Admin panel to access the Page cache setting. The Page cache feature of W3 total cache creates static html pages of WordPress posts and pages. So the pages are not generated dynamically every time they are requested. hence it reduce load considerably on the server and site loads faster. There are many option here, but we need not worry about all the features and leave them as per default setting. We just need to change the settings under General category. See the image below:
The settings page above shows that the Page cache feature is currently enabled. Make sure in your set up it reads the same. If you have followed the general setting instruction above, it will read enabled. However for you, if it says disabled, go back to general settings and Enable Page cache. It also gives the option to Empty cache, which will rebuild a new cache with your changes if you have made any.
The option Don’t cache pages for logged in users has been selected for the benefit of Admin who can see the changes in the live site without clearing the cache every time they make any changes. Homepage being the most viewed pages for many site we have selected to cache Home page.
We recommend to go with the default settings for options under Advanced, cache preload and Varnish.
Minify settings:
Minify is the process of compressing CSS, HTML and JavaScript by removing the comments and line break as well as zipping it and then combining the similar files together. So the size of those files will be reduced and loading will be faster. In our test with JS files minified and combined, we ran into some issues with the sites where in tabbers, lazy loading as well as some other functions which depends upon JavaScript did not work. So we disabled the Minify features in W3 Total Cache and used a separate plugin called Wp-Minify. With Wp-Minify we were able to combine and minify the js and css without affecting site features dependent on JavaScript. We also got better Page speed and Yslow result with Wp-minify.
So our recommendation is disable the Minify features in W3 Total cache.
Database Cache & Object Cache Settings:
This Database Cache feature helps in caching Database queries. So when a database query is made it goes through the cache. If the query is not found in the cache then only actual query to DB will be made. In a WordPress based site what we see at the front end is a result of many database queries in the back-end. Options like Page views, number of comments etc are pulled up from database using queries. So caching these queries will reduce the load on the DB and we can significantly improve the performance.
We suggest not to make any changes in the settings for Database cache and Object Cache, just leave the default intact. If you are on a shared hosting environment, you may even consider disabling these 2 options. If the disk responds slower than the database, these caches don’t help. On the other hand, if the disk works fast, Database Cache and Object Cache can considerably speed up the site.
Browser cache:
When we access a website for the first time, the static files like css, JavaScript etc are downloaded onto our browser and stored in browser’s cache. Next time we access the same website those static files are accessed from the cache. The Browser Cache feature of W3 Total Cache helps in the setting of the behaviors of those cache-able files. It enables http compressions and specify expiration header for the files. The setting in browser cache helps the web browser to understand how to behave with the cache-able files. The browser cache settings will change the rule in .htaccess file. So if you are not sure about modifying the rules in .htaccess file, making changes through the browser settings is the best option. A correct setting here will definitely increase the PageSpeed as well as Yslow score.
By default Enable HTTP (gzip) compression and set W3 Total Cache header is enabled. We suggest you the following settings for browser cache:
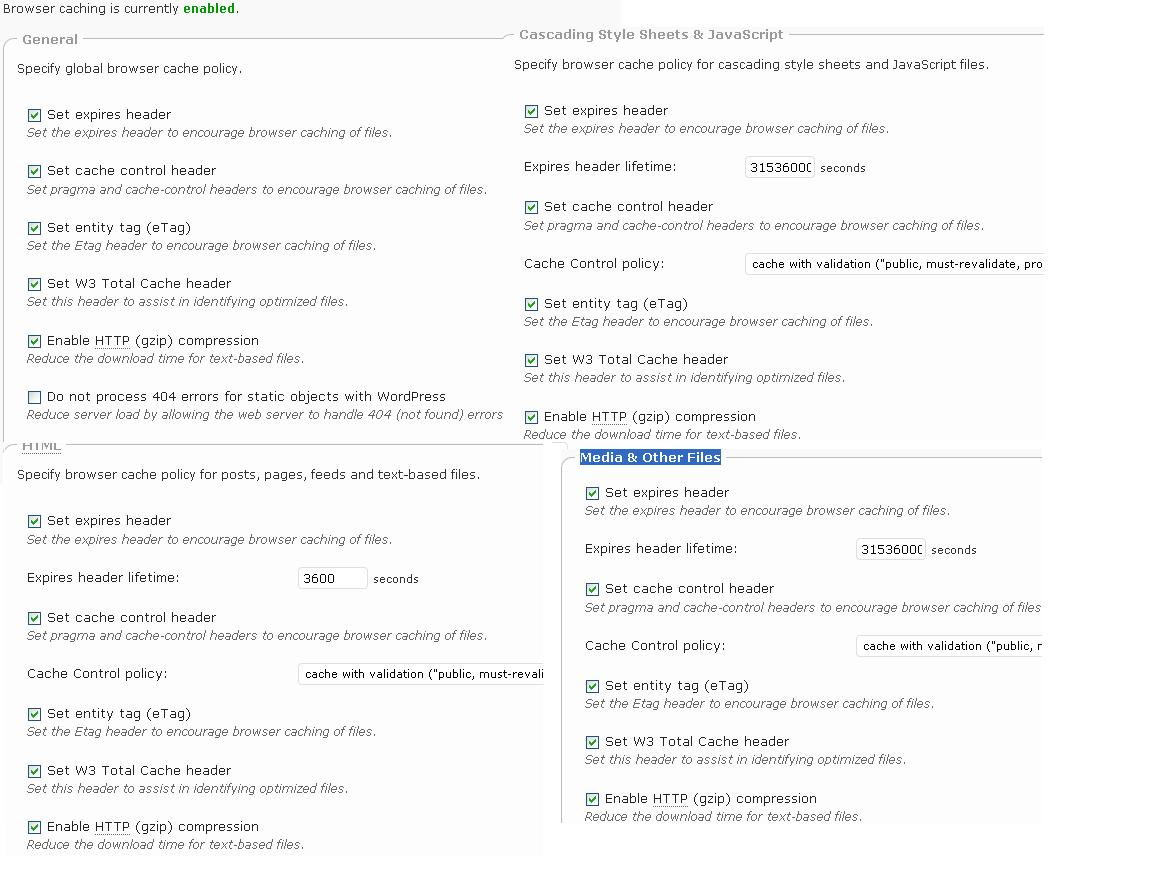
Under General Setting Enable(check) the options Set expires header, Set cache control header, Set entity tag (eTag), Set W3 Total Cache header, Enable HTTP (gzip) compression and disable only the option Do not process 404 errors. Enable all the options under Cascading Style Sheets & JavaScript, HTML and Media & Other Files.
The final setting for browser Cache should look like this:
 User Agent Group settings:
The user agent group setting has no impact in performance. This is always enabled and helps in redirecting user based upon the user agent of the browser to a different website theme or a different page or altogether a different domain. We can create a group of user agents and take specific action for the group. This option is useful to redirect mobile users to a mobile theme and normal computer users to a normal website theme.
Content Delivery Network Settings:
This is another very important feature of W3 Total Cache plugin. One limitation of web browsers is that simultaneously a browser can download 2 resources from a domain. So while accessing a website the download able objects have to wait in a que to be downloaded to the browser, so the site load time increases. By using a Content Delivery Network we separate those objects from our primary domain as well as we offer the flexibility of those files being served from a globally distributed network of the CDN service we use. Hence the site loads much faster. We can even use a sub domain like cdn.primarydomain.com and serve our static files from that sub domain to allow simultaneous download of files.
Currently we at Techie Zone use Speedy Mirror as our CDN provider. This offers 50GB of free bandwidth which is enough for a normal website with around 1000 visitors per day to sustain for 6 to 8 months. If you are looking for a free CDN provider, Speedy Mirror is the best among all. It requires minimal configuration and very easy to set up. The CDN settings we provide here is for speedy mirror. The setup procedure for speedy mirror is so easy that we do not feel like providing the steps here. You just need to register there and provide your domain name. It will provide you a sub domain URL like xxx.speedymirror.com. The static files automatically gets downloaded to their server.
 For Speedy Mirror as your CDN provider, we need to Enable the CDN option and set mirror as the CDN type in General setting. Now in CDN settings page under configuration, put the sub domain name you obtained from Speedy Mirror (while setting up the account) for replace site’s host name with option and Auto for SSL support option. Click on Test mirror to test if this is working correctly.
Under general setting, we need to check the options Host wp-includes/ files, Host theme files and Host custom files. Leave the options under Advanced as default.
As we are done with all the settings now, you can check the site performance in GTMetrix and note the scores and compare that with your earlier score. You will surely have a smile on your face looking at those green values.
This concludes the tutorial for setting up the W3 Total Cache plugin. I have tried my best to provide the steps in as simple ways as possible. If you are stuck while setting up the plugin or need any help, you are always welcome to ask for help and we will be glad to help you.
If you need advanced support for setting up this plugin or improving your site speed, we can assist you for a small fee. You contact us and we will get back to you with details.

