Categories
Webmaster Wordpress

WordPress 3.2 features and test drive

Automattic seems to be in a spree to bring new and exciting features to it’s most widely used bogging platform WordPress. In the last few months we have seen WordPress is going constant overhaul. And we saw the platform has evolved tremendously. Just recently we heard about WordPress 3.0 and then it WordPress 3.1 was released soon after. Now the talk of the bogging arean is the release of WordPress 3.2. The beta version of WordPress 3.2 is already available for download and the final stable version is expected quite soon.

WordPress 3.2 is expected with a lot of new and exciting features, so we downloaded the beta version to give it a try. And guess what, this version of WordPress is just amazing. Some of the notable features in WordPress 3.2 are a new User Interface for Admin, Distraction free writing, New default theme, change in system requirement and a much anticipated Faster WordPress.

New User Interface for Dashboard:

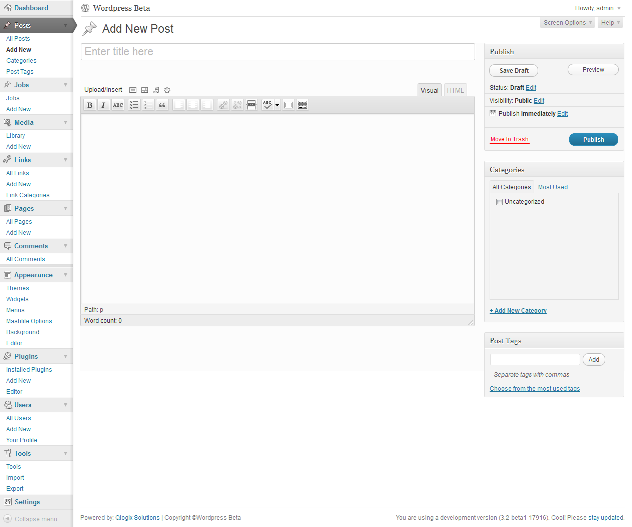
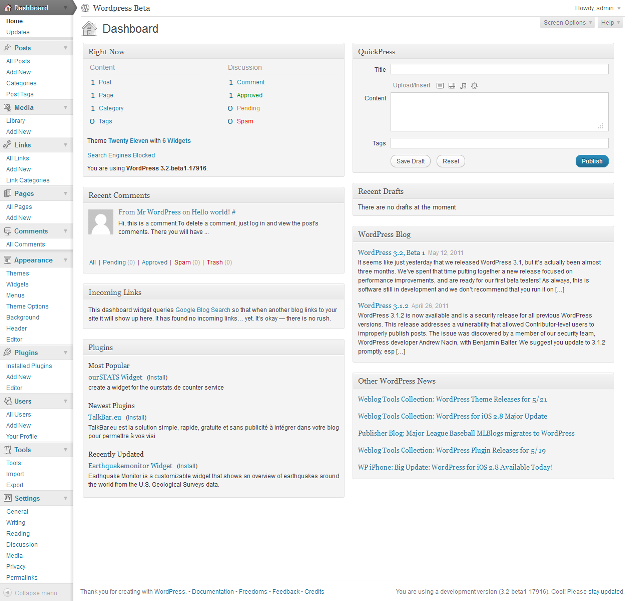
The Admin Interface in WordPress 3.2 s not a complete makeover but a slight change as compared to it’s predecessor 3.x. This new look good cool and elegant and occupy less space. There is also a new option at the bottom to collapse the menu which will then show the icons for different section of the menu and hovering on the icons will reveal the menu options. The footer area in the Admin dashboard has also got a facelift. Also the Favorite menu at the top right is removed. This new Admin Interface looks quite professional and neat. Overall I like it pretty much.

New Default theme Twenty Eleven:

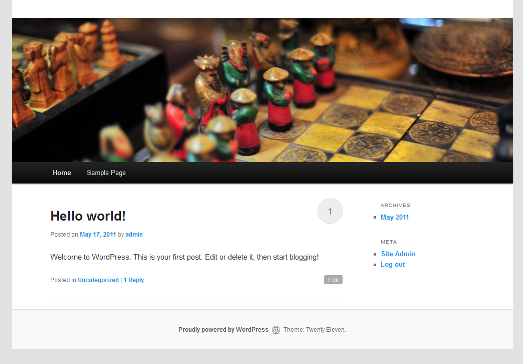
As we are already in 2011, so the default theme Twenty Ten that comes with current versions of WordPress also need a change. Matt finally realized that and the default theme from WordPress 3.2 will be Twenty Eleven. It does not mean they are scrapping out the Twenty Ten theme. hence WordPress 3.2 will come with 2 themes like the 2.x versions but Twenty Eleven will be installed by default.

Clutter Free Write Panel:

Don’t you feel like putting your complete concentration on the content while writing a post? I surely do. To help us concentrate in creating a better post, the WordPress 3.2 will feature a less cluttered and clean write panel. By default all the options like Excerpts, trackbacks, custom fields etc will be hidden. So if you do not see those excerpts or custom filed, do not panic, you just need to Click oN Screen Options at the top right and check the options which you really need.

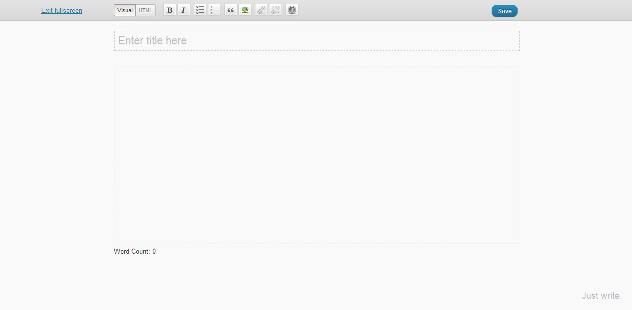
If that is not enough, you click on full screen mode and you will see a completely new write panel which you will fall in love with for sure. This full screen write panel is definitely a boon. I am going to utilize this feature to the fullest.

Performance Improvement:

While everything being the same, WordPress 3.2 provides a better performance and a faster site load as compared to it’s predecessors. This is very much essential considering Google is now taking into account the page load time while ranking websites.

Change in System requirement:

If you are quite excited with all these new features and are in a hurry to upgrade to WordPress 3.2 when the stable release comes in, you need to first check with your hosting provider to verify if your server meets the system requirement for WordPress 3.2. As going forward WordPress will require PHP 5.2.4 and MySql 5.0. Once you are sure your host meets the requirement, then you decide to upgrade.

Also WordPress 3.2 will not support Internet Explorer 6. Though the front end of your website/blog will not receive any warning, when you try to log into the Admin Dashboard you will be warn that you are using an unsecured version of Internet Explorer and it will ask you to upgrade the browser.

The current release of WordPress 3.2 is a beta version, so do not use it on your live site. As lot of bug is expected and site might become unstable.

If you have not yet tried the WordPress 3.2 beta, we have setup a WordPress 3.2 test drive site so that you can try it on our server and familiarize yourself with the features. use the username and Password both as qlogix to login.

Categories
Webmaster Wordpress

Mashlife the best Mashable clone theme released

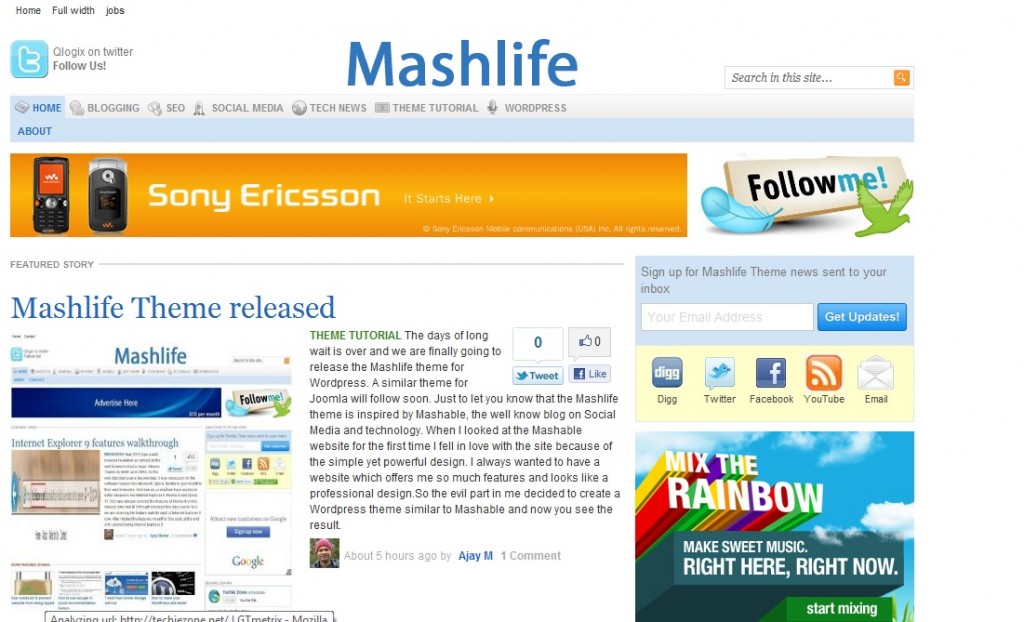
The elegant look of the Mashable website has enticed many theme developers to create a theme similar to Mashable as well as many bloggers want to have a website that look like Mashable. All thanks to the elegant Mashable design. Some of the theme developers have tried their hand on doing something similar but nothing is as appealing as the recently released Mashlife theme. If you are not convinced then a look at the demo site of Mashlife will definitely make you spellbound.

Mashlife WordPress theme is the first theme developed by Qlogix Solutions and they have done a fantastic job. Almost all the features available in Mashable has been cloned into Mashlife theme. So we regard Mashlife as the best Mashable clone theme.

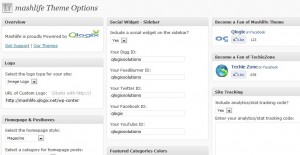
Mashlife is a clean, elegant looking and SEO optimized WordPress theme and have lots of customization option through Theme option in Admin panel without getting into the real code. Qlogix Solutions have also created many video tutorial as well as text based tutorials to help setting up the theme for newbies. Apart from that fantastic support is also available through email. So if you are looking for an amazing professional theme and ready to go online within minutes, Mashlife is the best theme choice for you.

Features of Mashlife theme:

Mashlife not only offers the look of Mashable but also offers many of the features available in it. let’s have a look at the amazing features:

General features:

– Compatible with the latest version of WordPress (3.1.2) and utilizes many advanced features like menu managment.

– Clean and elegant look

– Advanced theme control panel to customize various aspects of the theme

– Logo switcher between image/text and custom logo.

– Home page style selection between blog and magazine.

– Widgetized footer area and sidebar

– Author bio box for single posts.

– Automatic thumbnail creation and caching for better loadtime.

– Flexibility of thumbnail selection through custom filled for featured post.

– Integrated google analytics

– Integrated Gravatar support

Social Features:

– Built-in support for social media network and feedburner

– Built-in support for Open Graph protocol and Facebook like button.

– Integrated Facebook Like box in sidebar.

– SEO and adsense optmized

Advanced Features:

– Ads control through Theme control panel.

– Custom page template for full width page, job board etc.

– Advance features like custom post type to place job board like  Mashable on the frontpage.

– Mashable like colored menu for categories.

– Support for lazy loading of images upon page scroll

– Support for related posts without any plugin.

– Amazingly fast loading to help in google ranking. (With the help of a caching plugin like W3 total cache it will be much faster and will give much better page speed score)

– Lots of new features to be added in the upcoming releases.

These are just some of the features of Mashlife theme and we feel unless you have a test drive of the Mashlife theme on your own, you will not be able to realize the true potential of this theme.

Mashlife theme is available for purchase in 3 different flavors, e.g Single use license to be used in only 1 website, multiple use license to be used in more than one website and developers license without any restriction.

Pricing:

Single License Mashlife theme:  USD 39.9

Multiple site license mashlife theme: USD 99.9

Developer license Mashlfe theme: USD 149.9

If you are wondering, we are using an advanced version of Mashlife theme with developer license here in Techie Zone.

View Mashlife Theme Demo

Buy Mashlife Theme

Use the coupon Code TECHIEZONE while checking out to get a 15% discount.

Categories
Tutorials Wordpress

How to configure W3 Total cache for best performance

Since the time Google announced that the Page Load time also plays an important role in ranking a web site, all of us are craving for a faster site load to get the SERP. But WordPress is notoriously famous for giving slow performance as it dynamically generates every posts and pages using database queries. Usage of various plugins for customization of a WordPress based site adds to this to make the site more slower. It does not mean that we will abandon WordPress and embrace another blogging platform. WordPress is the best blogging platform and have millions of good things to offer. There are various ways to make the WordPress based site faster.

Using a good performance optimization plugin is one of the best way to make your site faster. When we think of performance optimization plugin 2 things come to our mind e.g W3 Total cache and WP Super cache. For a week or so I have been testing both the plugins in various websites and in all my tests W3 total cache has far exceeded WP Super cache in all aspects. The Page speed and Yslow scores are higher in all my tests while using W3 total cache. Only problem with W3 total cache is that, it has huge customization option and if not done properly will result into a negative effect. Hence in this tutorial, I will take you through a step by step configuration of W3 Total cache.

Before you activate W3 Total cache, we suggest you to check the PageSpeed and Yslow score of your website using GTMetrix. Make a note of the scores and see the differences in score after you finish configuring the plugin.

Installing W3 Total Cache

First of all uninstall/deactivate any performance optimization (caching) plugins like WP Super cache. This is mandatory to avoid any conflict in further steps. When you are sure there is no caching plugin running, Download W3 Total Cache for free from WordPress Plugin repository and save it on the desktop. Unzip the archive and use your favorite ftp program to upload it to the wp-content/plugins folder of the website where you want to configure W3 total cache. Before we activate and proceed with the configuration, we will need to make the wp-content folder writable. So using the FTP client, change permission of wp-content folder to 777 till we are done with set up. Now go to WordPress Admin panel and click on plugins, look for W3 total cache in the list of inactive plugins and activate it. Upon activation a new menu item as shown in figure will appear in Admin panel.
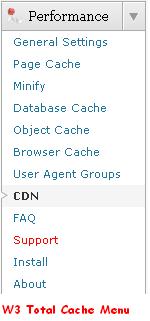
This plugin has a nice notification system, which will issue notification messages whenever some action needs to be performed.

General Settings:

The first step in the configuration process is the general setting. Click on the General settings from the new Performance menu that appear. You will be presented with the General settings page.

The General settings is an overview of different features available in W3 total cache. This will show settings for Page Cache, Minify, Database Cache, Object Cache, Content Delivery Network (CDN) and Browser Cache. From here we can globally enable or disable a feature available in W3 Total Cache. By Default the W3 Total cache runs in preview mode. In that mode any changes we make in the plug-in will not be applicable to the live site. So our very fast job is to enable the plugin for the live site by disabling the Preview mode, hence the General settings page will look like this:
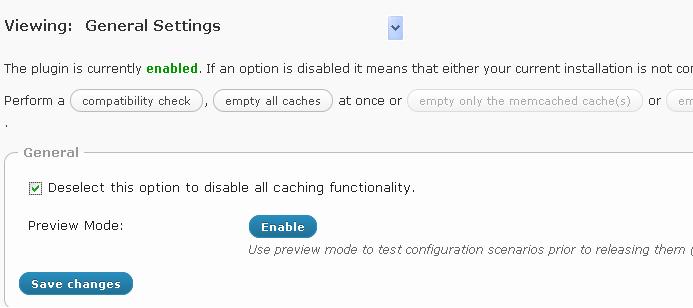
If you disable any of the features under general settings the option “Deselect this option to disable all caching functionality” will be automatically unchecked. So if you disable any feature and see that the option is unchecked, do not worry about it. It looks like a wrong reference. While testing various options I found that the Minify settings from W3 total cache can be disabled and we can use another plugin called Wp-Minify for the best minification. So my suggestion for General settings is
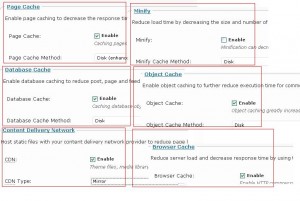
Page Cache:  Enable  and the method is Disk (enhanced)

Minify: Disable

Database cache: Enable and the method is Disk

Object cache: Enable and the method is Disk

Content Delivery Network: Enable and the CDN type depends upon what kind of CDN you use.

Browser Cache: Enable.

Once you are sure the general settings look like the above, we can proceed with the configuration of individual features.

Page Cache Setting:

Click on the drop down that reads general setting and select Page cache or click on Page cache from the Performance menu on Admin panel to access the Page cache setting. The Page cache feature of W3 total cache creates static html pages of WordPress posts and pages. So the pages are not generated dynamically every time they are requested. hence it reduce load considerably on the server and site loads faster. There are many option here, but we need not worry about all the features and leave them as per default setting. We just need to change the settings under General category. See the image below:
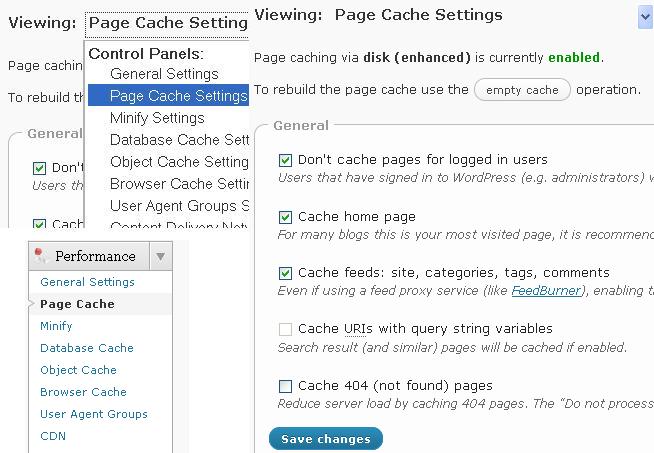
The settings page above shows that the Page cache feature is currently enabled. Make sure in your set up it reads the same. If you have followed the general setting instruction above, it will read enabled. However for you, if it says disabled, go back to general settings and Enable Page cache. It also gives the option to Empty cache, which will rebuild a new cache with your changes if you have made any.

The option Don’t cache pages for logged in users has been selected for the benefit of Admin who can see the changes in the live site without clearing the cache every time they make any changes. Homepage being the most viewed pages for many site we have selected to cache Home page.

We recommend to go with the default settings for options under Advanced, cache preload and Varnish.

Minify settings:

Minify is the process of compressing CSS, HTML and JavaScript by removing the comments and line break as well as zipping it and then combining the similar files together. So the size of those files will be reduced and loading will be faster. In our test with JS files minified and combined, we ran into some issues with the sites where in tabbers, lazy loading as well as some other functions which depends upon JavaScript did not work. So we disabled the Minify features in W3 Total Cache and used a separate plugin called Wp-Minify. With Wp-Minify we were able to combine and minify the js and css without affecting site features dependent on JavaScript. We also got better Page speed and Yslow result with Wp-minify.

So our recommendation is disable the Minify features in W3 Total cache.

Database Cache & Object Cache Settings:

This Database Cache feature helps in caching Database queries. So when a database query is made it goes through the cache.  If the query is not found in the cache then only actual query to DB will be made. In a WordPress based site what we see at the front end is a result of many database queries in the back-end. Options like Page views, number of comments etc are pulled up from database using queries. So caching these queries will reduce the load on the DB and we can significantly improve the performance.

We suggest not to make any changes in the settings for Database cache and Object Cache, just leave the default intact. If you are on a shared hosting environment, you may even consider disabling these 2 options. If the disk responds slower than the database, these caches don’t help. On the other hand, if the disk works fast, Database Cache and Object Cache can considerably speed up the site.

Browser cache:

When we access a website for the first time, the static files like css, JavaScript etc are downloaded onto our browser and stored in browser’s cache. Next time we access the same website those static files are accessed from the cache. The Browser Cache feature of W3 Total Cache helps in the setting of the behaviors of those cache-able files. It enables http compressions and specify expiration header for the files. The setting in browser cache helps the web browser to understand how to behave with the cache-able files. The browser cache settings will change the rule in .htaccess file. So if you are not sure about modifying the rules in .htaccess file, making changes through the browser settings is the best option. A correct setting here will definitely increase the PageSpeed as well as Yslow score.

By default Enable HTTP (gzip) compression and set W3 Total Cache header is enabled. We suggest you the following settings for browser cache:

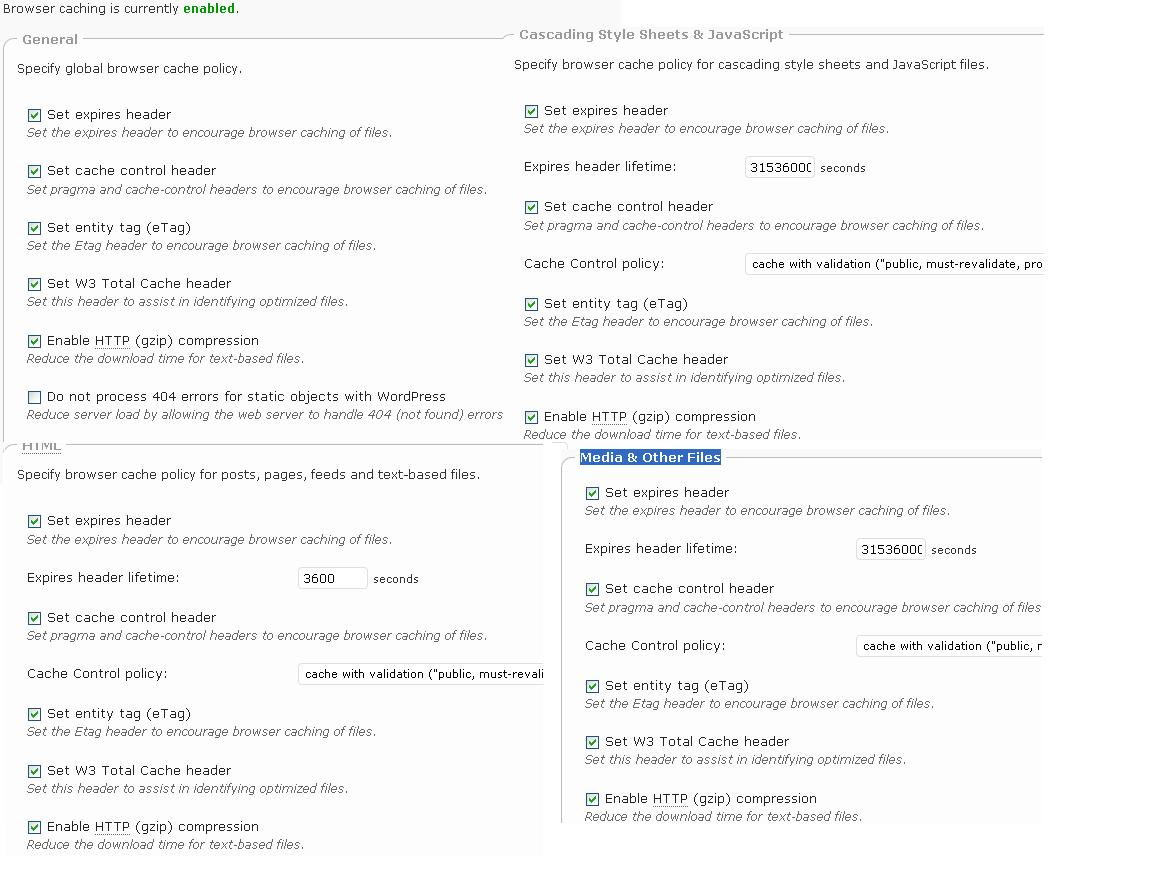
Under General Setting Enable(check) the options Set expires header, Set cache control header, Set entity tag (eTag), Set W3 Total Cache header, Enable HTTP (gzip) compression and disable only the option Do not process 404 errors. Enable all the options under Cascading Style Sheets & JavaScript, HTML and Media & Other Files.

The final setting for browser Cache should look like this:
User Agent Group settings:

The user agent group setting has no impact in performance. This is always enabled and helps in redirecting user based upon the user agent of the browser to a different website theme or a different page or altogether a different domain. We can create a group of user agents and take specific action for the group. This option is useful to redirect mobile users to a mobile theme and normal computer users to a normal website theme.

Content Delivery Network Settings:

This is another very important feature of W3 Total Cache plugin. One limitation of web browsers is that simultaneously a browser can download 2 resources from a  domain. So while accessing a website the download able objects have to wait in a que to be downloaded to the browser, so the site load time increases. By using a Content Delivery Network we separate those objects from our primary domain as well as we offer the flexibility of those files being served from a  globally distributed network of the CDN service we use. Hence the site loads much faster. We can even use a sub domain like cdn.primarydomain.com and serve our static files from that sub domain to allow simultaneous download of files.

Currently we at Techie Zone use Speedy Mirror as our CDN provider. This offers 50GB of free bandwidth which is enough for a normal website with around 1000 visitors per day to sustain for 6 to 8 months. If you are looking for a free CDN provider, Speedy Mirror is the best among all. It requires minimal configuration and very easy to set up. The CDN settings we provide here is for speedy mirror. The setup procedure for speedy mirror is so easy that we do not feel like providing the steps here. You just need to register there and provide your domain name. It will provide you a sub domain URL like xxx.speedymirror.com. The static files automatically gets downloaded to their server.

For Speedy Mirror as your CDN provider, we need to Enable the CDN option and set mirror as the CDN type in General setting. Now in CDN settings page under configuration, put the sub domain name you obtained from Speedy Mirror (while setting up the account) for replace site’s host name with option and Auto for SSL support option. Click on Test mirror to test if this is working correctly.

Under general setting, we need to check the options Host wp-includes/ files, Host theme files and Host custom files. Leave the options under Advanced as default.

As we are done with all the settings now, you can check the site performance in GTMetrix and note the scores and compare that with your earlier score. You will surely have a smile on your face looking at those green values.

This concludes the tutorial for setting up the W3 Total Cache plugin. I have tried my best to provide the steps in as simple ways as possible. If you are stuck while setting up the plugin or need any help, you are always welcome to ask for help and we will be glad to help you.

If you need advanced support for setting up this plugin or improving your site speed, we can assist you for a small fee. You contact us and we will get back to you with details.
Categories
Tips & tricks Webmaster

Use robots.txt to prevent website from being ripped

We all want to prevent our websites from being ripped. If you have a unique design the desire to prevent it from being duplicated is more. So we need to have an effective way of preventing rippers from getting an exact replica of our website. There are a plethora of website ripping applications like WinHTTrack or Webreaper which have been surfacing now a days and the rippers use these applications to create website replicas. They can use the replicated dump to create an exact clone of your website.

These rippers use bots to crawl the target websites and create static html version of all pages, copy the images, style sheets, JavaScript etc (Can not copy PHP or ASP files) and save them on the hard drive maintaining the directory structure and hyperlinks. Once the complete website is downloaded to your PC, you can use the website offline even if you are not connected to the Internet. These downloaded data can also be used to make an exact replica of your website. For static html based website the cloning becomes much easier. None of the webmaster will ever wish to allow anyone to rip their website but most of them wonder how to prevent such an operations.

The image below shows how the usage of an effective robots.txt file in our website root prevented WinHTTrack to copy our content and data:

We can use the robots.txt file to prevent the website ripper bots to crawl our website and subsequently the program will not be able to copy anything. We know that bots access to a website can be controlled using robots.txt which sits in the website root directory. Whenever we use a ripping program the bot used by the program will have to pass the check in robots.txt. If it finds that there the rule in robots.txt that disallows the bot, it will no longer be able to crawl the site which is a win-win situation for us. In robots.txt we have either an allow or a disallow rule, which looks like this:

User-agent: <User Agent name>
Disallow: /

User-agent: <User Agent name>
Allow: /

In the above examples the / indicates the root directory. It can be replaced with the directory path to which we wish to allow or deny the access. So when a bot goes through robots.txt and find itself under the Deny rule it will stop there itself and can no longer enter into the website.

This robots.txt method can be used to prevent email harvester, leechers or any such evil spirited applications from accessing your site. We have compiled a commonly used evil programs and created the deny rule for those programs. You can use the list below in your robots.txt file to create a preventive shield from the evil programs like WinHTTrack or Email Collector or Web Downloader. If you do not have a robots.txt file in your website root, create one with the following content or if you have one, you can just copy paste the content in your existing robots.txt file.

# This list is compiled by Techie Zone part of Qlogix Network.
User-agent: Teleport
Disallow: /
User-agent: TeleportPro
Disallow: /
User-agent: EmailCollector
Disallow: /
User-agent: EmailSiphon
Disallow: /
User-agent: WebBandit
Disallow: /
User-agent: WebZIP
Disallow: /
User-agent: WebReaper
Disallow: /
User-agent: WebStripper
Disallow: /
User-agent: Web Downloader
Disallow: /
User-agent: WebCopier
Disallow: /
User-agent: Offline Explorer Pro
Disallow: /
User-agent: HTTrack Website Copier
Disallow: /
User-agent: Offline Commander
Disallow: /
User-agent: Leech
Disallow: /
User-agent: WebSnake
Disallow: /
User-agent: BlackWidow
Disallow: /
User-agent: HTTP Weazel
Disallow: /

As this post is targeted for Webmasters and you are reading this post indicates that you are one of them, we would also suggest you to read the post on Increasing your website speed.

Categories
Web Design

Fonts used in the logos of popular brands

A well designed logo can create a good recall value of a brand. If you look at the logos of some of the successful brands like Microsoft, Google, Yahoo all of them create a long lasting impression in our mind. Selection of proper fonts for the logo is as important as the logo design itself. Most of the time when we suffer from design block while creating a logo and we are unsure of the font to use. The following list of successful brand logos are carefully picked to give you an idea about the typefaces (fonts in layman’s understanding) the designer have selected for the logos. Some of these logos are created with free fonts where as some are based on commercial fonts.


Google:

Google logo is so simple yet so powerful. At one glass it gives a high recall value. The carefully chosen color gives more value to the logo. This uses the Catull fonts created by Gustav Jaeger. The font became popular after Google started using this in their logo in 1999. Price of this font starts from USD 99.

Yahoo:

Yahoo primarily uses the red/violet color logo which is designed with a font by the same name. It is said that after the popularity Yahoo the font used to design the logo was named as Yahoo font. This font is created by Daniel Gauthier. Yahoo font is free for personal use.

Microsoft:

Microsoft uses a black/white version of the logo. This is also one of the simple yet powerful logo design where the brand recall value is concerned. We have identified this font as Neue Helvetica® 96 Black Italic with some variations.  This is a commercial font priced at approximately USD 49. In all the corporate branding Microsoft uses Segoe font created by Steve Matteson.

Facebook:

The Facebook logo is an example of simple yet elegant logo. The white color logo behind a blue background is quite talked about among logo designer. This logo is designed using the Klavika Font created by Eric Olson. It is a commercial font available for approximately USD 75.

Flickr:

When the famous blue/pink logo fo Flickr was introduced to netizens, it marked the starting of web 2.0 era. The bi-color logo with a spell error suddenly became a hit and represented web 2.0 standard. This logo is designed using the Frutiger font created and named after the designer Adrian Frutiger.

Twitter:

Most popular micro blogging platform twitter seems to use a free font called Pico Alphabet as the font of choice for it’s logo.

Xerox:

Xerox did corporate re-branding after 40 years, and the logo that came up looks quite attractive with red color for the typography and the red/white combination for the mascot. This logo uses the custom designed font called Xerox Sans a uniquely designed curvaceous, modern typeface with lots of personality, Created by Fontsmith. This is an exclusive font and not available for download or purchase.

CocaCola:

We could not find the original typeface used for the CocaCola logo, however we could find a free font called LokiCola that certainly resembles the CocaCola logo font.

Vodafone:

The logo of Vodafone is created with a custom Vodafone font. This is an exclusive font and not available for download or purchase.

There are certainly a lot more popular logos there and can be part of this posts, howver we encourage our users to list out 1 each and share that through comment section.

Categories
Webmaster Wordpress

How to make your WordPress site faster

If you have a blog running on a WordPress installation you might have noticed that the loading time of the blog is not as impressive as other non wordpress based sites. WordPress is database driven and is developed with PHP and MySql. Contrary to a static html based website where all the available pages are already present, WordPress generates the pages on the fly with the help of database queries. If you are on a shared hosting, where there are restrictions in CPU usage and system resources, it is very much required to make your WordPress installation as optimized as possible. Failing this your site will be very very slow and increase server load considerably resulting in cancellation of your hosting account. Also a faster site will provide a better user experience and a lesser bounce rate. It has been noted that 40-60% of daily visitors to a site are first time visitors so they come with an empty cache. Making your page fast for these first time visitors is key to a better user experience.

There are various ways to improve the load time of any websites, but in this topic we will primarily discuss about a WordPress based website. Following the methods described below will definitely make your website lot faster as well as reduce the load on the server.

1. Optimizing the header.php

If you look at the header.php file of a WordPress theme, you will see a lot of php codes in it. For the easier usage of themes the theme developer usually pulls lot of data from the database. But when we install the theme we need to make as many option static and hard coded as possible. Making the header of any WordPress theme static/hard coded will reduce almost 10 to 12 queries. Let’s see this with an example of one of our in-house developed theme Mashlife:

We have the following lines in header.php that can be changed to hard-coded code once this theme is installed on a website.

<meta http-equiv="Content-Type" content="<?php bloginfo('html_type'); ?>; charset=<?php bloginfo('charset'); ?>" />
<link rel="stylesheet" type="text/css" href="<?php bloginfo('stylesheet_url'); ?>" media="screen" />
<link rel="alternate" type="application/rss+xml" title="<?php bloginfo('name'); ?> RSS Feed" href="<?php bloginfo('rss2_url'); ?>" />
<link rel="alternate" type="application/atom+xml" title="<?php bloginfo('name'); ?> Atom Feed" href="<?php bloginfo('atom_url'); ?>" />
<link rel="pingback" href="<?php bloginfo('pingback_url'); ?>" />
<link rel="shortcut icon" href="<?php bloginfo('template_directory'); ?>/images/favicon.ico" />
<script language="javascript" type="text/javascript" src="<?php bloginfo('template_url'); ?>/javascripts/jquery.js"></script>
<script language="javascript" type="text/javascript" src="<?php bloginfo('template_url'); ?>/javascripts/tabber.js"></script>
<script language="javascript" type="text/javascript" src="<?php bloginfo('template_url'); ?>/javascripts/superfish.js"></script>
<script language="javascript" type="text/javascript" src="<?php bloginfo('template_url'); ?>/javascripts/lazyload.js"></script>

The above codes can be easily changed to the below code and it will still give the same result.

</pre>
<meta http-equiv="Content-Type" content="text/html; charset=UTF-8" />
<link rel="stylesheet" type="text/css" href="http://sitename.com/wp-content/themes/themename/style.css" media="screen" />
<link rel="alternate" type="application/rss+xml" title="Sitename RSS Feed" href="http://sitename.com/feed/" />
<link rel="alternate" type="application/atom+xml" title="Sitename Atom Feed" href="http://sitename.com/feed/atom/" />
<link rel="pingback" href="http://sitename.com/xmlrpc.php" />
<link rel="shortcut icon" href="http://sitename.com/favicon.ico" />
<script language="javascript" type="text/javascript" src="http://link-to-javascript-folder-in-theme/jquery.js"></script>
<script language="javascript" type="text/javascript" src="http://link-to-javascript-folder-in-theme/tabber.js"></script>
<script language="javascript" type="text/javascript" src="http://link-to-javascript-folder-in-theme/superfish.js"></script>
<script language="javascript" type="text/javascript" src="http://link-to-javascript-folder-in-theme/lazyload.js"></script>

The best way to convert the dynamic php code to hard-coded static html code is, by viewing the source of the website and copy those lines directly from the source and replace with corresponding lines in header.php. The above example will reduce the database queries by 10.

2. Optimizing the footer.php

The footer area in WordPress blog is served by footer.php file. This file also contains some lines of code that can also be converted to static hard-coded html code. You can look for Powered by line and also “template_directory” lines in the code and replace them accordingly (refer the tips in header optimization. In our Mashlife theme we can replace the following codes:

<a href="http://qlogix.net/"><img src="<?php bloginfo('template_directory')?>/images/logo-small.png" width="97" height="25" alt="Qlogix Solutions" /></a>
<a href="http://wordpress.org/"><img src="<?php bloginfo('template_directory')?>/images/wp-logo.png" height="25" alt="Wordpress" /></a>

With this one:

<a href="http://qlogix.net/" title="Qlogix Solutions"><img src="http://techiezone.net/wp-content/themes/mashlife/images/logo-small.png" width="97" height="25" alt="Qlogix Solutions" /></a>
<a href="http://wordpress.org/"><img src="http://techiezone.net/wp-content/themes/mashlife/images/wp-logo.png" height="25" alt="Wordpress" /></a>

This changes will reduce another 2 queries to the database.

3. External Stylesheet and script:

Put the stylesheets and java scripts in external files so that these files will be cached by the web broswer and will not be downloaded upon every page visits. This will also reduce the size of html document.

4. Reduce the number of http requests:

Each mention of style sheets and scripts in an html/php document increase the http request by one there by increasing load time. So whenever possible combine all css into one style sheets and all scripts into a single scripts. For images, the best method to reduce http request is the use of CSS Sprites.

Also note that the plugins add Database queries as well as style sheets, those style sheets will again take additional queries to retrieve the style information. We can combine these styles with our theme’s style sheet and reduce queries as well as clutters in the website. To see if any plugin is adding style sheets and Javascript, just view the source of the website and look in the header and footer area.

<p id="line28"><link rel="stylesheet" href="<a href="view-source:http://techiezone.net/wp-content/plugins/sharebar/css/sharebar.css">http://techiezone.net/wp-content/plugins/sharebar/css/sharebar.css</a>" type="text/css" media="screen" />

A code like above indicates that the sharebar plugin in my WordPress installation is adding styles through sharebar.css file. WordPress beginner has a nice post detailing the effects of WordPress plugin to site load.

5. Remove unnecessary plugins:

Use only the required plugins, do not over load your WordPress installation with unnecessary plugins which is not serving any real purpose. Most of the time I am tempted to install plugins to achieve something which is not really required. So always stay away from those plugins. We will publish a list of really important plugins for WordPress in a  future post.

6. Use a caching plugin:

The caching plugins like WP Super Cache creates html version of your WordPress pages which is directly served by Apache. This method of serving webpages does not require processing large chunk of php codes on each request, hence this substantially increase page load time to a higher extent and reduce server load.

7. Minify Javascript and css:

Minifying is the process of removing unnecessary characters, white spaces and comments from the code to reduce the size, which in turn improves the load time. You can use WP Minify plugin to compress and combine your css and javascript files. The WP Minify grabs JS/CSS files in your generated WordPress page and passes that list to the Minify engine. The Minify engine then returns a consolidated, minified, and compressed script or style for WP Minify to reference in the WordPress header.

8. Use Yslow to determine the load issue:

Yslow by yahoo is a Firefox extension which works wth Firebug add-ons. It analyzes web pages and suggests ways to improve their performance based on a set of rules for high performance web pages.

The above methods can be performed by any one and will help in page load time to a great extent. There are other methods which may not be as easy as the above and can not be recommended for a newbie, also they may incur cost like using Content Delivery Network (CDN) to serve your static contents.

Please let us know if your site load time increased after following the methods listed here. Also please share any other emthods which you feel will contribute to sites load time without lot of efforts.


Categories
Web hosting Webmaster

How to overwrite php.ini settings using .htacess

Couple of days back I was working on a project for one of my clients. During that I came across a situation where in I had to set display_errors in php.ini to On for the particular client’s application. But in my WebServer I preferred to keep display_errors to Off. I did not want my original php.ini file to change and let the effect flow to all sites hosted in my WebServer. In such situations we always have alternatives method to make our task easier and achieve what we wish.

So before I proceed with the method to achieve the result, let me introduce you to php.ini. It is the configuration file used to customize the behavior of PHP in runtime. When PHP is started it looks for the php.ini file and load the desired settings. There is lot of confusion among fellow webmasters about the location of original php.ini file in the webserver. Depending upon the configuration of the webserver php.ini file can be found in any of the following locations:

/etc/php.ini

/etc/php/php.ini

/etc/php5/php.ini

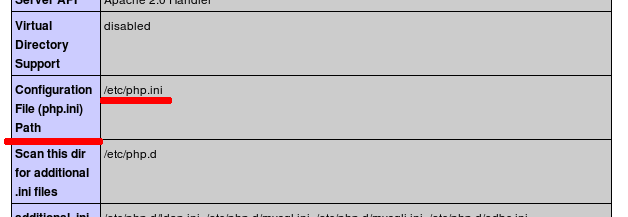
The best way to find where the php.ini file is by using the phpinfo() function. Create a file called info.php and paste the following code inside it. Put this file in the root directory of your website.

<?php phpinfo() ?>

When you execute this file through web browser it will show you the different php settings including the location of php.ini file.

.htaccess (Hyper Text Access) is a directory level configuration file primarily used by Apache webserver, that allows decentralized management of web server configuration. You need to create the .htaccess file in the document root of your website through ftp as Windows will not allow you to create/rename files to .htaccess (or any name starting with dot)

As we are familiar with php.ini and .htaccess by now, let’s look at the method to overwrite the php.ini settings for each script or website. When we are on a shared hosting and we do not have access to the global php.ini file, at those moments this method of overwriting php.ini settings through .htaccess will definitely come as a rescue.

– If you do not have an .htaccess file in your website document root create one through ftp

– In the .htacess file put the required php settings in the following format:

<php_flag> <settings_name> <Settings_value (On|Off)>

<php_value> <settings_name> <Settings_value>

The php_flag is used to set the directive to boolean values, for example for the directives like display_errors or set_register_globals which takes On|Off as values

The php_value is used to set the directive to actual values like upload_max_filesize which takes values like 10M or 20M

After you make changes in .htaccess file the sample htaccess content should look like this:

### Custom php.ini setting
php_flag display_errors On
php_value  max_upload_filesize  10M

Note: this .htaccess method only works if you are using Apache webserver.

Categories
Product release Wordpress

JetPack lets you get wordpress.com features in your self hosted wordpress

Without an iota of doubt, I would like to say that WordPress is the best and most popular blogging platform. This comes in 2 flavors, One is the self hosted version of WordPress, which is released by Automattic under GNU-GPL license. The other one is WordPress.com, which provides a free as well as paid (premium) platform hosted iin cloud to publish your blog. So even if you do not have a domain name or web server you can still create your blog as a subdomain of WordPress.com and publish it.

There are certain extremely good features and benefits that a WordPress.com users enjoys, those until now were officially not available in self hosted version of WordPress. Though some of the features like WordPress.com stats were made available in self-hosted version with the help of specialized plugins. According to the founder of Automattic & man behind WordPress Matt, it was his dream to provide feature parity between WordPress.com and self-hosted WordPress. And finally his dream has turned into reality in the form of a plugin called JetPack , which gives you all the features in WordPress.com that we always wanted in our self hosted version of WordPress.

With the launch of the first version of JetPack, following 8 features (cloud goodies) of WordPress.com will be activated in your self-hosted version of WordPress when you activate JetPack plugin. JetPack connects to WordPress.com and enables the awesome features in your self hosted version of WordPress.

1. WordPress.com Stats : It provides a simple and concise statistics for yur website without any additional load on your server.

2. Twitter Widget: If your theme supports widget, it will show latest tweets from a twitter user.

3. Gravatar Hovercards: It is a cool feature & I always wanted to have in my website. This will show a pop-up business card of user’s gravatar profile when you hover the mouse over their name.

4. Wp.me shortlinks: The default URL shortening service from Automattic. All your posts & pages will be able to sue this for better sharing in micro blogging platform like twitter.

5. Sharedaddy: It will make the Sharing of your posts easier over the social networks & social bookmarking sites

6. Latex: is the famous markup language to insert mathematical equations inside your post and pages.

7. After the deadline: This a spelling, grammar and style checker with built-in AI.

8. Shortcode Embeds: Add movies, images, flash etc into your posts & pages with single line of code.

The list does not end here. In the coming version of the plugin, expect to see some more uberly cool features of WordPress.com.

If you are hosted with partner hosts of Automattic like Bluehost, DreamHost, Go Daddy, HostGator, Media Temple, and Network Solutions then the one click installation of WordPress available with them is JetPack enabled.  That means when you install WordPress through one click install, you do not need to install the JetPack plugin separately.

Download, Install & Pre-requisite:

1. Please note that Jetpack will work only with WordPress 3.0.5 and later version, you also need a WordPress.com account (if you do not have one you can create so during the setup process. If you meet these 2 requirements,

2. Visit the JetPack website to download the plugin.

3. Unpack and upload it to the plugins directory.

4. Log in to WordPress admin area and Activate the JetPack plugin. Upon Activation, it will show you a message to connect to WordPress.com. Click on the (see the image below)

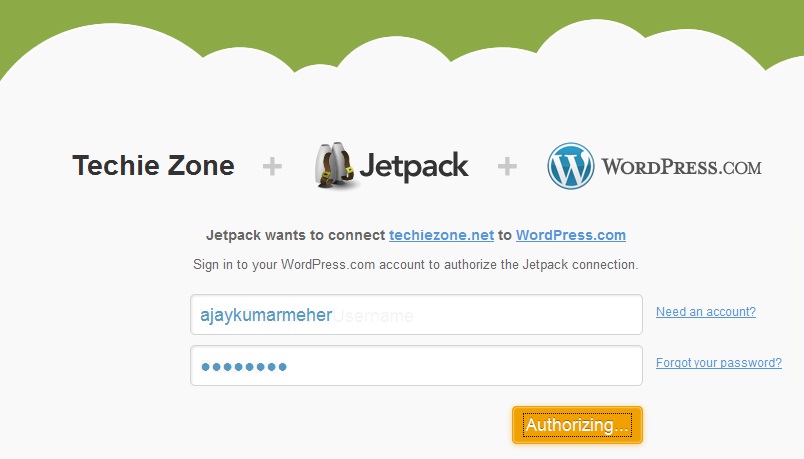
Jetpack actvation alert5. It will take you to an authorization page as shown in image below. Put your WordPress.com user name and Password and click on Authorize. If you do not have a WordPress.com account, you can create one here by clicking on need an account.

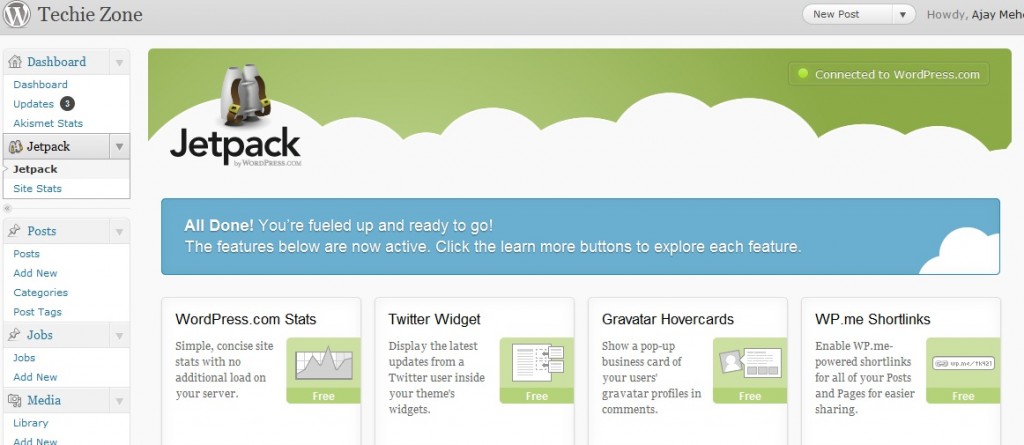
6. Upon successful authorization, you will be redirected back to your WordPress admin area and jetpack setting page will be shown. This looks like the one in the below image:

JetPack Dashboard

From here, you can customize the required features. JetPack not only connects you to WordPress.com  to provide awesome features, but also provides you the convenience of not installing several plugins.