Categories
Browsers

Internet Explorer 9 features walkthrough

Year 2011 saw a web browser revolution as almost all the web browsers had a major release. Thanks to html5 and CSS3. As the web standard saw a big overhaul, it was necessary for the software houses like Microsoft, Opera, Mozilla to give facelift to their web browsers. And now as a result we have access to better browsers like Internet Explorer 9, Firefox 4 and Opera 11. We have already covered the features of Firefox 4 on the release date and IE 9 though released few days earlier to it, we are covering the feature walk through of Internet Explorer 9 now. It shows our love for Firefox but I would like to say that Internet Explorer looks equally competitive in it’s new avatar as Internet Explorer 9. After I tested the features myself for this post, at the end of it I started loving Internet Explorer 9.

Internet Explorer 9 has seen major improvement in most of the aspects then the predecessors. Let’s have a look at the enormous amount of new features and improvement Internet Explorer 9 currently sports:

Speed:

Microsoft claims Internet Explorer 9 to be the fastest browser. But not sure if it is fastest among all other versions of Internet Explorer or fastest among all the available browsers :). Whatever be it speed is definitely a noticeable improvement in IE 9. Internet Explorer 9 takes full advantage of both the operating system and hardware to fully accelerate rendering of web pages. IE 9 leverages the power of the GPU through the DirectX®, Direct2D® and DirectWrite® API’s to ensure that text is crisp, graphics and animations are smooth. New GPU powered HTML5 enables stunning HD video and audio content without the need for a plug-in.

IE 9 uses a brand new JavaScript engine called Chakra. It is optimized to take advantage of the multiple CPU cores running on Windows Vista and Windows 7 by compiling the JavaScript to highly efficient machine code in the background, while interpreting the JavaScript in the foreground. Once compilation is finished, Chakra switches to the compiled and significantly faster machine code optimized for that PC.   Internet Explorer 9 scores very well in popular JavaScript benchmarks like WebKit’s SunSpider.

HTML 5 canvas support:

Canvas is a way to program graphics on the web. Ths standard has been included with html5. The canvas tag is an “immediate mode” (drawing commands are immediately applied) two-dimensional drawing surface that web developers can use to deliver things like real-time graphs, animations, or interactive games without requiring a separate plug-in to be downloaded. IE 9 has full support for this canvas.

Better User Interface:

IE 9 sports a clean and clutter free user Interface. In Internet Explorer 9, the simplified yet enhanced user interface and user experience puts the focus on the content of each website. By default, only the controls essential for browsing are in the browser frame and less screen real estate is used compared to other current browsers, letting people browse and experience all that the sites have to offer.
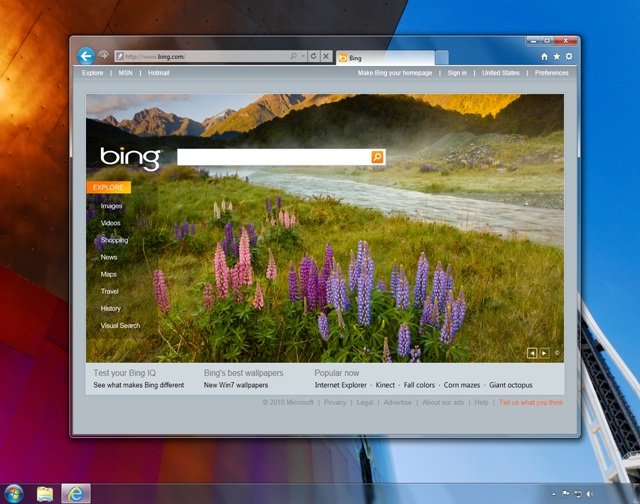
Characteristics of each website are reflected throughout the experience, allowing users to focus on and be more immersed in the site’s content. Elements of each website are integrated into the browser. If a site is pinned to the task bar, when the site is launched, the navigational controls integrate the site’s icon and primary color.

New Tab page:

IE 9 uses Windows Direct User Interface (DUI) to create a graphical new tab page that loads quickly and features crisp graphics. When users create a new tab, their intent is to navigate. Internet Explorer 9 focuses on making this experience fast by visually suggesting the sites you visit frequently. Each site is represented by a tile with a large favicon and a title, and users can track their browsing habits with a meter on each tile. From the new tab page, users can also reopen closed tabs, reopen their last browsing session, and start an InPrivate Browsing session.

Optimized Navigation Controls:

IE 9 uses a simplified navigation control. As modern websites include much of the functionality that browsers had in the past, the new browser frame emphasizes the controls that are necessary for browsing, with customizations available to show more controls. The back button in IE 9 is made far larger then any other previous version, because, it is the most used item and it has been placed at the top left. The address bar and search box are combined into one and now called One Box, and the Tools menus are consolidated into a single drop-down menu. Only the functionality necessary for a modern browsing experience is shown.

Pinned Sites:

With Pinned Sites, a user’s favorite websites can be accessed directly from the Windows taskbar without opening the browser. IE 8 introduced Web slices in the Favorites Bar. Because users wanted their sites still more readily available, IE 9 introduced Pinned Sites. With pinned sites you can bring your favorite sites into the Windows taskbar to make access even more efficient. You can pin sites to the taskbar by dragging the thumb pin icon  from One Box to the taskbar. When a pinned site is launched from the taskbar, the browser frame and navigational controls integrate the site’s icon and primary color, emphasizing the site and providing an even more site-focused experience.

Tear off Tab:

If you drag a tab away from the page, the tab will open a new instant of Internet Explorer Window.

Jumplists and Thumbnail Preview:

Jump Lists take users right into the websites they use every day. They’re a quick and easy to way to visit frequently visited websites without first opening Internet Explorer. For example, a user may frequent a particular online bookstore and may always start with her wishlist.To open the Internet Explorer 9 Jump List, users can right-click the Internet Explorer icon on the taskbar. They’ll see their pinned websites, as well as the sites that they visit often. There’s also access to start InPrivate Browsing, open new tabs, or close a window.

Any website that’s pinned to the taskbar also has a Jump List. What’s seen in each of these Jump Lists depends on each website, but all of them include InPrivate Browsing, opening the site, unpinning the site, and closing the window.
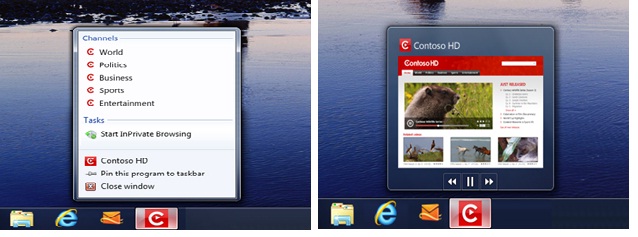
Thumbnail preview controls available on the Windows 7 taskbar provide quick navigation to the sites that users want to visit. Some websites that are pinned to the taskbar have additional controls. When a user hovers over a thumbnail for a website in the taskbar, they may see things like playback controls, similar to the controls in Windows 7 for Windows Media Player.

Notification Bar:

Notification bar in IE 9 has been moved to bottom of the browser. Messages in the Notification Bar are clearer and do a better job explaining to the user what they need to know. For example, instead of receiving the message “Internet Explorer is not responding,” the user receives the message “The website is not responding”.

Download Manager:

IE 9 incorporates an integrated integrated Download Manager to provide hassle free downloading and great security for downloaded content. The new Download Manager replaces the Run, Save As, or Cancel box used in earlier versions of Internet Explorer. With the new user interface, users can easily view download progress, open content that they’ve downloaded, Pause and Resume file download or cancel a download that is in progress. A default folder is used for all downloaded content, so users can also change the default download destination folder. As a security measure, all downloads are now scanned for virus and downloads of executable are verified for reliable source using WinVerifyTrust.

Domain Highlighting:

When displaying the current URL in the One Box, IE 9 highlights the domain name in black, while the rest of the URL is shown in grey. This makes it easier to identify the actual identity of the sites that users visit and helps to alert users about deceptive websites with misleading addresses. This can reduce the chances of compromising personal information while browsing and definitely curb the phising sites.

The features mentioned above are some of the noticeable and much talked about features you will see in IE 9. We have prepared a Power Point Presentation IE 9 features explained with great screenshots and explanation of all features in more detail. You can download the IE 9 features presentation .

Categories
Tips & tricks Webmaster

Use robots.txt to prevent website from being ripped

We all want to prevent our websites from being ripped. If you have a unique design the desire to prevent it from being duplicated is more. So we need to have an effective way of preventing rippers from getting an exact replica of our website. There are a plethora of website ripping applications like WinHTTrack or Webreaper which have been surfacing now a days and the rippers use these applications to create website replicas. They can use the replicated dump to create an exact clone of your website.

These rippers use bots to crawl the target websites and create static html version of all pages, copy the images, style sheets, JavaScript etc (Can not copy PHP or ASP files) and save them on the hard drive maintaining the directory structure and hyperlinks. Once the complete website is downloaded to your PC, you can use the website offline even if you are not connected to the Internet. These downloaded data can also be used to make an exact replica of your website. For static html based website the cloning becomes much easier. None of the webmaster will ever wish to allow anyone to rip their website but most of them wonder how to prevent such an operations.

The image below shows how the usage of an effective robots.txt file in our website root prevented WinHTTrack to copy our content and data:

We can use the robots.txt file to prevent the website ripper bots to crawl our website and subsequently the program will not be able to copy anything. We know that bots access to a website can be controlled using robots.txt which sits in the website root directory. Whenever we use a ripping program the bot used by the program will have to pass the check in robots.txt. If it finds that there the rule in robots.txt that disallows the bot, it will no longer be able to crawl the site which is a win-win situation for us. In robots.txt we have either an allow or a disallow rule, which looks like this:

User-agent: <User Agent name>
Disallow: /

User-agent: <User Agent name>
Allow: /

In the above examples the / indicates the root directory. It can be replaced with the directory path to which we wish to allow or deny the access. So when a bot goes through robots.txt and find itself under the Deny rule it will stop there itself and can no longer enter into the website.

This robots.txt method can be used to prevent email harvester, leechers or any such evil spirited applications from accessing your site. We have compiled a commonly used evil programs and created the deny rule for those programs. You can use the list below in your robots.txt file to create a preventive shield from the evil programs like WinHTTrack or Email Collector or Web Downloader. If you do not have a robots.txt file in your website root, create one with the following content or if you have one, you can just copy paste the content in your existing robots.txt file.

# This list is compiled by Techie Zone part of Qlogix Network.
User-agent: Teleport
Disallow: /
User-agent: TeleportPro
Disallow: /
User-agent: EmailCollector
Disallow: /
User-agent: EmailSiphon
Disallow: /
User-agent: WebBandit
Disallow: /
User-agent: WebZIP
Disallow: /
User-agent: WebReaper
Disallow: /
User-agent: WebStripper
Disallow: /
User-agent: Web Downloader
Disallow: /
User-agent: WebCopier
Disallow: /
User-agent: Offline Explorer Pro
Disallow: /
User-agent: HTTrack Website Copier
Disallow: /
User-agent: Offline Commander
Disallow: /
User-agent: Leech
Disallow: /
User-agent: WebSnake
Disallow: /
User-agent: BlackWidow
Disallow: /
User-agent: HTTP Weazel
Disallow: /

As this post is targeted for Webmasters and you are reading this post indicates that you are one of them, we would also suggest you to read the post on Increasing your website speed.

Categories
Web Design

Fonts used in the logos of popular brands

A well designed logo can create a good recall value of a brand. If you look at the logos of some of the successful brands like Microsoft, Google, Yahoo all of them create a long lasting impression in our mind. Selection of proper fonts for the logo is as important as the logo design itself. Most of the time when we suffer from design block while creating a logo and we are unsure of the font to use. The following list of successful brand logos are carefully picked to give you an idea about the typefaces (fonts in layman’s understanding) the designer have selected for the logos. Some of these logos are created with free fonts where as some are based on commercial fonts.


Google:

Google logo is so simple yet so powerful. At one glass it gives a high recall value. The carefully chosen color gives more value to the logo. This uses the Catull fonts created by Gustav Jaeger. The font became popular after Google started using this in their logo in 1999. Price of this font starts from USD 99.

Yahoo:

Yahoo primarily uses the red/violet color logo which is designed with a font by the same name. It is said that after the popularity Yahoo the font used to design the logo was named as Yahoo font. This font is created by Daniel Gauthier. Yahoo font is free for personal use.

Microsoft:

Microsoft uses a black/white version of the logo. This is also one of the simple yet powerful logo design where the brand recall value is concerned. We have identified this font as Neue Helvetica® 96 Black Italic with some variations.  This is a commercial font priced at approximately USD 49. In all the corporate branding Microsoft uses Segoe font created by Steve Matteson.

Facebook:

The Facebook logo is an example of simple yet elegant logo. The white color logo behind a blue background is quite talked about among logo designer. This logo is designed using the Klavika Font created by Eric Olson. It is a commercial font available for approximately USD 75.

Flickr:

When the famous blue/pink logo fo Flickr was introduced to netizens, it marked the starting of web 2.0 era. The bi-color logo with a spell error suddenly became a hit and represented web 2.0 standard. This logo is designed using the Frutiger font created and named after the designer Adrian Frutiger.

Twitter:

Most popular micro blogging platform twitter seems to use a free font called Pico Alphabet as the font of choice for it’s logo.

Xerox:

Xerox did corporate re-branding after 40 years, and the logo that came up looks quite attractive with red color for the typography and the red/white combination for the mascot. This logo uses the custom designed font called Xerox Sans a uniquely designed curvaceous, modern typeface with lots of personality, Created by Fontsmith. This is an exclusive font and not available for download or purchase.

CocaCola:

We could not find the original typeface used for the CocaCola logo, however we could find a free font called LokiCola that certainly resembles the CocaCola logo font.

Vodafone:

The logo of Vodafone is created with a custom Vodafone font. This is an exclusive font and not available for download or purchase.

There are certainly a lot more popular logos there and can be part of this posts, howver we encourage our users to list out 1 each and share that through comment section.

Categories
Internet Social Media Tech News

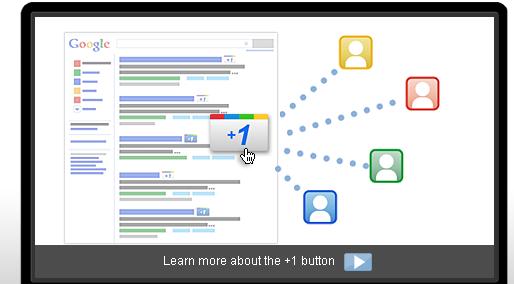
How to use Google +1 social recommendation feature

The Search Engine giant Google announced yesterday about  a new Social recommendation features called Google +1 which is inline with the Facebook’s like button. Google seems to be in a hurry in releasing new features to enhance the end users experience and provide the best search result. Some days back they released the feature to block unwanted search result and now this Google +1. Google claims that it is their endeavor to provide better result through human recommendation rather then completely relying on machine. With this new Google +1 feature you can now publicly recommend any search result or ads that appear in Google search result and it will be included with the search result. Google will show the number of recommendations for that search result when it will appear for any query.

Google +1 is now released as an Experimental feature and in order to be able to use this service you need to have a Google profile and join this experiment. In order to enjoy the Google +1 feature, please perform the following steps in the same order as they are given below:

1. If you do not have a Google profile create a Google profile and make it public. If you have a Google profile upgrade it to accommodate the new features.

2. Go to Google Labs experimental search page and click on Join this experiment button. (Thanks Vibin Reddy)

3. While logged in to your Google account search for something in Google and look for the search result. You will see the +1 button beside the search result now. Click on the +1 button near any relevant result to leave your recommendation for that page to the world.

4. For the first time when you click on the +1 button you will see a pop up window where you will need to confirm for the +1 to take effect.4. You can undo your action immediately by clicking on the button again.

While showing the recommendations to you or any one in the search result Google takes into account your social connections to determine. The social connection includes people from your Google contact, Google Buzz  and Google reader followers and Google chat contacts.

Managing the +1s

All the +1 recommendation you have done will be available in your Google profile +1’s tab. However you have the option to choose whether to make this tab publicly available or make it private by clicking on Edit Profile and un checking the option “Show this tab on my profile”. In order to manage the +1s:

1. Login to your Google profile and click on +1’s tab.(For me the +1 tab did not appear immediately but took almost 5 minutes after I did a recommendation)

2. You can delete any recommendations, you no longer want to share from this tab by clicking on the X mark towards the right of the +1 content.

+ 1 on non-Google sites: (This part is a direct copy from Google as the information is not clear)

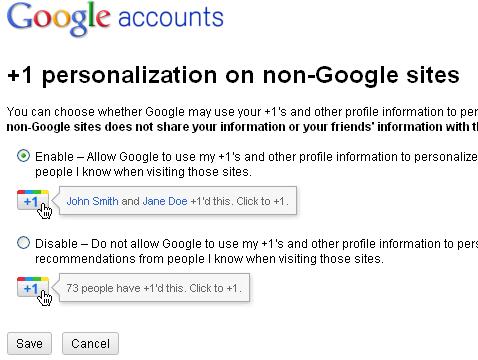
The only time the +1 button will associate your identity with specific web content is when you choose to click the +1 button for something on the web. By clicking the +1 button, you’re explicitly signaling interest in displaying, sharing, or recommending specific online content, including ads. So if your friend chooses to +1 an ad, page, or search result, you might see that +1 on other websites. Google stores your +1’s to personalize the web, for example, by showing them to your social connections and others who may find it relevant. To change the +1 preference on non-Google sites:

1. Login to your Google account

2. Click on the Edit link near + 1 on non-Google sites

3. Select the appropriate option in the following window and click on save.

Google will utilize the +1 activity, Google profile and your social connection to tailor made the content for and ads for you. Though this is a nice move from Google to make their search result more social but it has lot of potential for exploitation. In order to promote the search result website owner will now hire people to recommend their website and gain higher recommendation for crappy results. But when this is used without any evil purpose this will definitely going to help web searcher to find good result for their queries. Please share your opinion on what you feel about this new Google +1 feature.

Categories
Internet Web App

7 best free Online Storage service

The Internet has clearly played a vital role in our life. Now our workplace is no longer limited to Office cubicle or our sweet home but has become a mobile office.  In some situations we also access different systems from time to time. In such cases we need our files and documents to be readily available to us whenever we wish.This is when an online storage or Cloud Storage comes as a rescue. Online Storage service helps us in accessing our files and folders from any computer over the Internet. They make it possible by syncing our files and documents from computers to a cloud storage. So with an Internet connection we can access the latest updated file from any where in the world. With a boom in cloud computing many Online Storage service providers have come up. We need to have a clear evaluation of those services before we sign up with them.

In this article we will have a brief overview of 5 of the best free Online Storage service currently available. Please make a note that we are not considering about the file hosting service like file serve or rapidshare, which are different than our topic of discussion. We have shortlisted the service providers based upon criteria like:

– Storage capacity

– Ease of use

– Speed of sync/upload/download

– Features of the service

– SugarSync

SugarSync is my first choice when it comes to Online Storage as it offers almost all functionalities that I need in a good Online Storage service. Sugar Sync is an online cloud storage service which gives option to backup, share and sync your files between any number of computers. IT also facilitates the access to files through mobile devices like iPhone and Android based phone. Some of the features of SugarSync includes:

1. The free plan provides a whopping 5GB space plus additional 500 MB space for each referral and 250MB space for completing the steps in getting started.

2. Provides Windows & MAC client (SugarSync manager) so you can use the Online drive as if it is a normal hard drive in your PC.

3. There is no limit to the number of PCs that can be synced.

4. Offers seamless collaboration among team members so you can share different files with different members.

5. Photos synced with SugarSync are automatically organized into photo albums.

6. The music files synced with SugarSync can be played over the internet using the SugarSync music player.

If you have iPhone or iPod Touch, you must download the free SugarSync App, it is amazing and I am quite satisfied with it.

You can Signup for SugarSync and enjoy 5GB of free Online storage.

-Box.net

Box.net is another pretty good Online Storage service provider which offers some of the quite impressive specs. It has a pretty good user interface and offers syncing files to their cloud storage. Box.net clearly distinguish between free users and paid users and there by limit the features to free users. Some of the features of Box.net are:

– The free plan provides 5GB of storage with 25MB file size limit.

– Offers direct we blink to share files and folders.

– Unlike the SugarSync the desktop client is available only for business and enterprise users.

– The folders can be designated as a public webpage with a  vanity URL.

– It also provides mobile access through iPhone and Android apps or through a mobile site.

– Provides 256 bit encryption for business users.

– Dropbox

Dropbox is the simplest of the above two in terms of look as well as functionalities but offers a wide variety of features when you install the dropbox client. It offers other features like sync, backup, mobile access and desktop client for easier access. The free version of Dropbox only offers 2GB space and additional 250MB space for each referral when they signup and install dropbox client.The file upload size of Dropbox is just 300MB. All files stored on Dropbox enjoys the security of 256 bit SSL encryption.

– Windows Live Skydrive

Windows Live Skydrive is also one of my preferred Online Storage service provided by Microsoft. The primary reasons for popularity of SkyDrive are the 25GB free Online Storage and the ability to work with Microsoft Office document online without installing Microsoft Office. It also Provides Photoalbum, Access control based sharing so you have the power to decide who sees what. Another USP of SkyDrive is the SkyDrive synced storage available through Windows Live Mesh, which enables syncing of Photos and videos between your computer and SkyDrive. With so many features Windows Live SkyDrive online storage service is also a must have recommendation from us.

– Amazon Cloud Drive

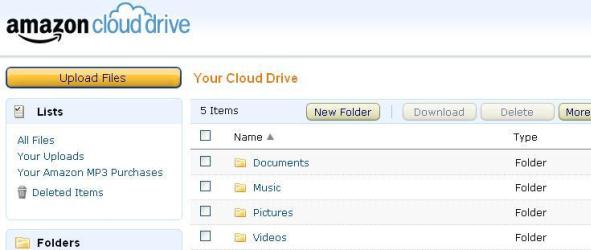
Amazon Cloud Drive is the newest offering from Amazon and has been launched just a couple of days ago. It gives 5GB of free Online Storage to store your important files, documents, photos and music securely in the cloud. As of now there is no desktop or mobile client for syncing files, so need to upload the files manually. However it supports file upload size of 2GB which a great advantage. I seriously hope that Amazon will come up with a desktop client for file synchronization and also a mobile client for access to files on the go. This will make Amazon Cloud drive as one of the most preferred Online Storage solution.

If you are located in United States and wish to upgrade the Amazon Cloud Storage space to 20GB, you can do so by spending just $1. The normal price for 20GB space is $20 per year, however if you buy a mp3 song from Amazon music store, Amazon will upgrade the free user limit to 20GB. Amazon music store is only available to US customers. Thanks Amit from Digital Inspiration for the tip.

– FlipDrive

The FlipDrive has quite impressive functionalities however it has limited features for free users. It offers only 1GB storage for free users and the cheapest plan starts at $4.95 per year. It synchronizes and  backup your files, folders, photos, music, contacts and calendars. With so many features we definitely need some additional space for free users. Moreover they do not have any referral program by which we can increase the storage limit for free account. This also does not have a desktop client available at this moment. So the sync process is purely manual.

-Adrive

The only reason we put Adrive in the list is because of the amount of disk space it offers. Adrive offers 50GB of free online storage. Apart from the massive amount of storage nothing looks impressive for ADrive. It does not have mobile access or a desktop client for syncing but supports both file and folder upload through browser using Java applet. Ads appears in the user interface and the UI looks very clutter. Overall if you wish to store a lot of junk items Adrive can be your preferred choice of service.

These online storage services not only make our files available to us whenever and wherever we need those, but they also give us an extra layer of protection by keeping a backup copy of our most important files. I usually use Online Storage for syncing files between my work and home PC and keep a backup copy of my most important documents and photos so that I will never lose them even if my hard drive or the backup DVD is gone. Please let us know which Online Storage service you are using and for what purpose you primarily use.

Categories
Webmaster Wordpress

How to make your WordPress site faster

If you have a blog running on a WordPress installation you might have noticed that the loading time of the blog is not as impressive as other non wordpress based sites. WordPress is database driven and is developed with PHP and MySql. Contrary to a static html based website where all the available pages are already present, WordPress generates the pages on the fly with the help of database queries. If you are on a shared hosting, where there are restrictions in CPU usage and system resources, it is very much required to make your WordPress installation as optimized as possible. Failing this your site will be very very slow and increase server load considerably resulting in cancellation of your hosting account. Also a faster site will provide a better user experience and a lesser bounce rate. It has been noted that 40-60% of daily visitors to a site are first time visitors so they come with an empty cache. Making your page fast for these first time visitors is key to a better user experience.

There are various ways to improve the load time of any websites, but in this topic we will primarily discuss about a WordPress based website. Following the methods described below will definitely make your website lot faster as well as reduce the load on the server.

1. Optimizing the header.php

If you look at the header.php file of a WordPress theme, you will see a lot of php codes in it. For the easier usage of themes the theme developer usually pulls lot of data from the database. But when we install the theme we need to make as many option static and hard coded as possible. Making the header of any WordPress theme static/hard coded will reduce almost 10 to 12 queries. Let’s see this with an example of one of our in-house developed theme Mashlife:

We have the following lines in header.php that can be changed to hard-coded code once this theme is installed on a website.

<meta http-equiv="Content-Type" content="<?php bloginfo('html_type'); ?>; charset=<?php bloginfo('charset'); ?>" />
<link rel="stylesheet" type="text/css" href="<?php bloginfo('stylesheet_url'); ?>" media="screen" />
<link rel="alternate" type="application/rss+xml" title="<?php bloginfo('name'); ?> RSS Feed" href="<?php bloginfo('rss2_url'); ?>" />
<link rel="alternate" type="application/atom+xml" title="<?php bloginfo('name'); ?> Atom Feed" href="<?php bloginfo('atom_url'); ?>" />
<link rel="pingback" href="<?php bloginfo('pingback_url'); ?>" />
<link rel="shortcut icon" href="<?php bloginfo('template_directory'); ?>/images/favicon.ico" />
<script language="javascript" type="text/javascript" src="<?php bloginfo('template_url'); ?>/javascripts/jquery.js"></script>
<script language="javascript" type="text/javascript" src="<?php bloginfo('template_url'); ?>/javascripts/tabber.js"></script>
<script language="javascript" type="text/javascript" src="<?php bloginfo('template_url'); ?>/javascripts/superfish.js"></script>
<script language="javascript" type="text/javascript" src="<?php bloginfo('template_url'); ?>/javascripts/lazyload.js"></script>

The above codes can be easily changed to the below code and it will still give the same result.

</pre>
<meta http-equiv="Content-Type" content="text/html; charset=UTF-8" />
<link rel="stylesheet" type="text/css" href="http://sitename.com/wp-content/themes/themename/style.css" media="screen" />
<link rel="alternate" type="application/rss+xml" title="Sitename RSS Feed" href="http://sitename.com/feed/" />
<link rel="alternate" type="application/atom+xml" title="Sitename Atom Feed" href="http://sitename.com/feed/atom/" />
<link rel="pingback" href="http://sitename.com/xmlrpc.php" />
<link rel="shortcut icon" href="http://sitename.com/favicon.ico" />
<script language="javascript" type="text/javascript" src="http://link-to-javascript-folder-in-theme/jquery.js"></script>
<script language="javascript" type="text/javascript" src="http://link-to-javascript-folder-in-theme/tabber.js"></script>
<script language="javascript" type="text/javascript" src="http://link-to-javascript-folder-in-theme/superfish.js"></script>
<script language="javascript" type="text/javascript" src="http://link-to-javascript-folder-in-theme/lazyload.js"></script>

The best way to convert the dynamic php code to hard-coded static html code is, by viewing the source of the website and copy those lines directly from the source and replace with corresponding lines in header.php. The above example will reduce the database queries by 10.

2. Optimizing the footer.php

The footer area in WordPress blog is served by footer.php file. This file also contains some lines of code that can also be converted to static hard-coded html code. You can look for Powered by line and also “template_directory” lines in the code and replace them accordingly (refer the tips in header optimization. In our Mashlife theme we can replace the following codes:

<a href="http://qlogix.net/"><img src="<?php bloginfo('template_directory')?>/images/logo-small.png" width="97" height="25" alt="Qlogix Solutions" /></a>
<a href="http://wordpress.org/"><img src="<?php bloginfo('template_directory')?>/images/wp-logo.png" height="25" alt="Wordpress" /></a>

With this one:

<a href="http://qlogix.net/" title="Qlogix Solutions"><img src="http://techiezone.net/wp-content/themes/mashlife/images/logo-small.png" width="97" height="25" alt="Qlogix Solutions" /></a>
<a href="http://wordpress.org/"><img src="http://techiezone.net/wp-content/themes/mashlife/images/wp-logo.png" height="25" alt="Wordpress" /></a>

This changes will reduce another 2 queries to the database.

3. External Stylesheet and script:

Put the stylesheets and java scripts in external files so that these files will be cached by the web broswer and will not be downloaded upon every page visits. This will also reduce the size of html document.

4. Reduce the number of http requests:

Each mention of style sheets and scripts in an html/php document increase the http request by one there by increasing load time. So whenever possible combine all css into one style sheets and all scripts into a single scripts. For images, the best method to reduce http request is the use of CSS Sprites.

Also note that the plugins add Database queries as well as style sheets, those style sheets will again take additional queries to retrieve the style information. We can combine these styles with our theme’s style sheet and reduce queries as well as clutters in the website. To see if any plugin is adding style sheets and Javascript, just view the source of the website and look in the header and footer area.

<p id="line28"><link rel="stylesheet" href="<a href="view-source:http://techiezone.net/wp-content/plugins/sharebar/css/sharebar.css">http://techiezone.net/wp-content/plugins/sharebar/css/sharebar.css</a>" type="text/css" media="screen" />

A code like above indicates that the sharebar plugin in my WordPress installation is adding styles through sharebar.css file. WordPress beginner has a nice post detailing the effects of WordPress plugin to site load.

5. Remove unnecessary plugins:

Use only the required plugins, do not over load your WordPress installation with unnecessary plugins which is not serving any real purpose. Most of the time I am tempted to install plugins to achieve something which is not really required. So always stay away from those plugins. We will publish a list of really important plugins for WordPress in a  future post.

6. Use a caching plugin:

The caching plugins like WP Super Cache creates html version of your WordPress pages which is directly served by Apache. This method of serving webpages does not require processing large chunk of php codes on each request, hence this substantially increase page load time to a higher extent and reduce server load.

7. Minify Javascript and css:

Minifying is the process of removing unnecessary characters, white spaces and comments from the code to reduce the size, which in turn improves the load time. You can use WP Minify plugin to compress and combine your css and javascript files. The WP Minify grabs JS/CSS files in your generated WordPress page and passes that list to the Minify engine. The Minify engine then returns a consolidated, minified, and compressed script or style for WP Minify to reference in the WordPress header.

8. Use Yslow to determine the load issue:

Yslow by yahoo is a Firefox extension which works wth Firebug add-ons. It analyzes web pages and suggests ways to improve their performance based on a set of rules for high performance web pages.

The above methods can be performed by any one and will help in page load time to a great extent. There are other methods which may not be as easy as the above and can not be recommended for a newbie, also they may incur cost like using Content Delivery Network (CDN) to serve your static contents.

Please let us know if your site load time increased after following the methods listed here. Also please share any other emthods which you feel will contribute to sites load time without lot of efforts.


Categories
Internet Social Media

Prevent the Facebook Virus “Get your Facebook Email” @facebook.com

It has been seen recently that Facebook has been the primary target for Scamsters like spammers and hackers. We have seen quite a lot of virus like ” Click here to see how I look like in 20 years” and “OMG I don’t believe this” spreading in Facebook now a days. The most recent one is the “Get your Facebook Email” @facebook.com. These viruses are spreading in the form of Facebook Apps and advertise themselves through Facebook chat messages. Many people think these are legitimate messages from their friends and fall victim to it. So this way the virus spreads themselves exponentially in a very short period of time.

Today I received a message from one of my blogger friend which said Hey claim your @ fb email address b4 its 2 late! bit.ly/fA05Dk. In a moment the suspicious me, found out that it is another hoax message. But I wanted to delve into it further. So I clicked on the link and found out that it is the work of a new App called ownuniqueemail. It seems I was among the first one to receive this message as at the time when I tried to access the app, it had only 2 fans. My suspicion grew stronger when I saw a message that the Application can not be accessed over https. (As I have enabled https in Facebook for better security). Within a couple of minutes I started receiving this hoax message from many friends. All saying the same thing in different variant and using different URL shortening service pointing to same app.

What does it do?

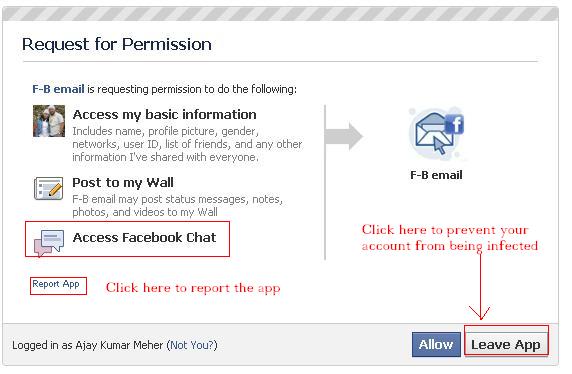
When you receive a message from your friend and you click on the link, the app will ask for your permission to integrate with your Facebook account. In the permission page it will also ask the permission to access Facebook Chat. Once you grant access that’s all. It will send a message to all your facebook friends which says “Get your Facebook Email” @facebook.com or “Hey claim your @ fb email address b4 its 2 late! bit.ly/fA05Dk” or some other variant of this message. In a very short span of time this App will spread virally. This has not been seen to cause any harm or steal/hack any account. This is just a self promoting application.

How to prevent “Get your Facebook Email” @facebook.com virus?

1. If you have enabled the https in Facebook account security section, you will see a message to switch to regular connection, when you click on the link to go to the apps page. So it will prevent you from direct access of the App. You can click on cancel on this page. Moreover this viral app can not be accessed over https. So you are somewhat safe.

2. Even if you have clicked on the link do not grant permission in the next page where it says “Request for permission”.  Just click on leave App and you are safe. As a contribution towards the community, you can instead click on Report App on the same page.

3. Ask your friends not to believe this message they received and refrain from sharing it. Also share this blog post with them and post about this post on FB wall. (I know this is a shameless promotion of my blog post, but at least it will help people in some ways.)

Please let us know if the post helped you and your friends by writing a few lines in the comment.

Categories
Internet Software

Convert Flash to HTML with Wallaby

Adobe has finally heard my plea and it’s a dream come true for me. I always wanted a way to convert the Flash (.fla) files to html for universal compatibility, and now I have an app that will help me to convert the .fla file to html5. The main benefit of converting the .fla to html is that we can view the product in any device that does not support flash run-time but supports html (which almost all the devices do). All this is possible with the help of an experimental technology developed by Adobe System called Wallaby currently available as a free download in Adobe labs. The biggest beneficiary of this will be the iOS users, like users of iPhone, iPad and iPod tocuh.


Wallaby converts Adobe Flash Professional (.fla) files into html5 format. Once converted into html5 version, this can be edited using any html editor and can be used with any device that supports html5. All standard web browsers now support html5. Just to add here, .fla is the raw file format for any flash application which is then converted (and compressed) to swf and is embedded on a web page. Wallaby does not have the ability to convert the .swf files to html5. So if you are thinking that you can now convert any embedded flash files to html5 and modify it according to your desire, you may be out of luck as there is no direct conversion possible. However you can use a swf decompiler tool to convert .swf to .fla and then use Wallaby to convert .fla to html5. Where wallaby is offered for free by Adobe, you might have to shell out a few buck to own a swf decompiler.

Wallaby offers immense possibility of usage of flash components in non-flash supported devices, as these can now leverage the power of html to have the same effects and functionality as flash. For example the flash based advertisement in mobile devices.

Things we must know before jumping to a conclusion:

1. It is only an early preview version, so offers very basic set of features. Many of the flash features are not supported under html5. The wallaby Release notes give a list of supported and unsupported features.

2. It is currently available as a 32 bit installer for Windows and Mac.

3. Wallaby can not convert .swf file to html5 directly. We need a 2 step process for that, which involves an application like swf decompiler.

4. At this time it uses Wekit css3 tags, so compatible with Webkit based browsers. This means the html5 output is not supported in Firefox or IE 9. As of now only supported browsers are Chrome(8.0 or later)  and Safari(5.0 or later).

If you are satisfied and want to give a try to Wallaby, you can download wallaby for free and see it in action, use it and submit any feature request and bugs.

My verdict is: Wallaby has immense potential to be a revolutionary product in future. Please share your opinion and experience with Wallaby & it’s future potential.

Categories
Internet Tips & tricks

How to type in your native language

Are you wondering, how your friends send you scrap in Hindi/Oriya/Tamil or how they update their Facebook status message in Hindi/Oriya/Tamil. If you use Orkut (seen in some other Google application like blogger, Gmail) you would have seen that there is an option to type in your native Indian languages like Hindi/Bengali/Tamil etc. This is all possible because of a technology called Transliteration. There are various Transliteration provider, but the one provided by Google is very accurate and offers lot of fucntionalities. Transliteration converts the typed English characters into a native language based upon how it is spoken. It is not same as translation. So with the help of Transliteration tools you can phonetically type a word in English using a roman keyboard and it will be converted to the desired native language. So when you type Mera Bharat Mahaan, it will be converted to मेरा भारत महान.

Google Transliteration tools are available in different formats like Transliteration Bookmarklet, Transliteration IME and a dedicated website.

The Goolge Transliteration website is a dedicated website by Google which can be used to type in 24 supported language like Amharic, Arabic, Bengali, Chinese, Greek, Gujrati, Hebrew, Hindi, Japanese, Kannada, Malayalam, Marathi, Nepali, Oriya, Persian, Punjabi, Russian, Sanskrit, Serbian, Sinhalese, Tamil, Telugu, Tigrinya and Urdu. Using this website you can type whatever you want and then copy the transliterated version of the text and paste it wherever you wish. I selected Hindi from the drop down and typed my name in English using my normal keyboard and it got converted to अजय कुमार मेहेर.


Google Transliteration Bookmarklet is another way to use the transliteration service in any website with a text box to type. This bookmarklet is a simple piece of code which resides in the browser and provides you the option to chat, compose an email, update Facebook status or send scrap in your native language. Google Transliteration Bookmarklets are available in 19 different languages – Amharic, Arabic, Bengali, Greek, Gujarati, Hindi, Kannada, Malayalam, Marathi, Nepali, Persian, Punjabi, Russian, Sanskrit, Serbian, Tamil, Telugu, Tigrinya and Urdu. In order to use the Transliteration bookmarklet fature, you need to drag the appropriate bookmarklet to your browser’s bookmark toolbar.  For example to type in Hindi Drag the following bookmarklet to your Bookmark toolbar.

Type in Hindi

Transliteration IME offered by google is an Input Method Editor(IME) a very small program which allows to enter text in your native language using a standard Roman keyboard. Google Transliteration IME is available for 22 different languages – Amharic, Arabic, Bengali, Farsi, Greek, Gujarati, Hebrew, Hindi, Kannada, Malayalam, Marathi, Nepali, Oriya, Punjabi, Russian, Sanskrit, Serbian, Sinhalese, Tamil, Telugu, Tigrinya and Urdu. The Google IME provides the most advanced features and lot of customization. We ned to install a separate IME for each language. Once installed, it will show a status window at the bottom right corner of desktop. It has options to change language as well as settings option. This page provides further information about the Google transliteration IME.

Categories
Web hosting Webmaster

How to overwrite php.ini settings using .htacess

Couple of days back I was working on a project for one of my clients. During that I came across a situation where in I had to set display_errors in php.ini to On for the particular client’s application. But in my WebServer I preferred to keep display_errors to Off. I did not want my original php.ini file to change and let the effect flow to all sites hosted in my WebServer. In such situations we always have alternatives method to make our task easier and achieve what we wish.

So before I proceed with the method to achieve the result, let me introduce you to php.ini. It is the configuration file used to customize the behavior of PHP in runtime. When PHP is started it looks for the php.ini file and load the desired settings. There is lot of confusion among fellow webmasters about the location of original php.ini file in the webserver. Depending upon the configuration of the webserver php.ini file can be found in any of the following locations:

/etc/php.ini

/etc/php/php.ini

/etc/php5/php.ini

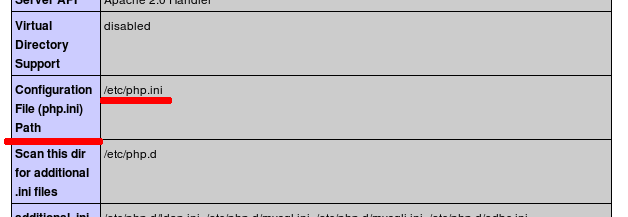
The best way to find where the php.ini file is by using the phpinfo() function. Create a file called info.php and paste the following code inside it. Put this file in the root directory of your website.

<?php phpinfo() ?>

When you execute this file through web browser it will show you the different php settings including the location of php.ini file.

.htaccess (Hyper Text Access) is a directory level configuration file primarily used by Apache webserver, that allows decentralized management of web server configuration. You need to create the .htaccess file in the document root of your website through ftp as Windows will not allow you to create/rename files to .htaccess (or any name starting with dot)

As we are familiar with php.ini and .htaccess by now, let’s look at the method to overwrite the php.ini settings for each script or website. When we are on a shared hosting and we do not have access to the global php.ini file, at those moments this method of overwriting php.ini settings through .htaccess will definitely come as a rescue.

– If you do not have an .htaccess file in your website document root create one through ftp

– In the .htacess file put the required php settings in the following format:

<php_flag> <settings_name> <Settings_value (On|Off)>

<php_value> <settings_name> <Settings_value>

The php_flag is used to set the directive to boolean values, for example for the directives like display_errors or set_register_globals which takes On|Off as values

The php_value is used to set the directive to actual values like upload_max_filesize which takes values like 10M or 20M

After you make changes in .htaccess file the sample htaccess content should look like this:

### Custom php.ini setting
php_flag display_errors On
php_value  max_upload_filesize  10M

Note: this .htaccess method only works if you are using Apache webserver.