Categories
Internet Web App

7 best free Online Storage service

The Internet has clearly played a vital role in our life. Now our workplace is no longer limited to Office cubicle or our sweet home but has become a mobile office.  In some situations we also access different systems from time to time. In such cases we need our files and documents to be readily available to us whenever we wish.This is when an online storage or Cloud Storage comes as a rescue. Online Storage service helps us in accessing our files and folders from any computer over the Internet. They make it possible by syncing our files and documents from computers to a cloud storage. So with an Internet connection we can access the latest updated file from any where in the world. With a boom in cloud computing many Online Storage service providers have come up. We need to have a clear evaluation of those services before we sign up with them.

In this article we will have a brief overview of 5 of the best free Online Storage service currently available. Please make a note that we are not considering about the file hosting service like file serve or rapidshare, which are different than our topic of discussion. We have shortlisted the service providers based upon criteria like:

– Storage capacity

– Ease of use

– Speed of sync/upload/download

– Features of the service

– SugarSync

SugarSync is my first choice when it comes to Online Storage as it offers almost all functionalities that I need in a good Online Storage service. Sugar Sync is an online cloud storage service which gives option to backup, share and sync your files between any number of computers. IT also facilitates the access to files through mobile devices like iPhone and Android based phone. Some of the features of SugarSync includes:

1. The free plan provides a whopping 5GB space plus additional 500 MB space for each referral and 250MB space for completing the steps in getting started.

2. Provides Windows & MAC client (SugarSync manager) so you can use the Online drive as if it is a normal hard drive in your PC.

3. There is no limit to the number of PCs that can be synced.

4. Offers seamless collaboration among team members so you can share different files with different members.

5. Photos synced with SugarSync are automatically organized into photo albums.

6. The music files synced with SugarSync can be played over the internet using the SugarSync music player.

If you have iPhone or iPod Touch, you must download the free SugarSync App, it is amazing and I am quite satisfied with it.

You can Signup for SugarSync and enjoy 5GB of free Online storage.

-Box.net

Box.net is another pretty good Online Storage service provider which offers some of the quite impressive specs. It has a pretty good user interface and offers syncing files to their cloud storage. Box.net clearly distinguish between free users and paid users and there by limit the features to free users. Some of the features of Box.net are:

– The free plan provides 5GB of storage with 25MB file size limit.

– Offers direct we blink to share files and folders.

– Unlike the SugarSync the desktop client is available only for business and enterprise users.

– The folders can be designated as a public webpage with a  vanity URL.

– It also provides mobile access through iPhone and Android apps or through a mobile site.

– Provides 256 bit encryption for business users.

– Dropbox

Dropbox is the simplest of the above two in terms of look as well as functionalities but offers a wide variety of features when you install the dropbox client. It offers other features like sync, backup, mobile access and desktop client for easier access. The free version of Dropbox only offers 2GB space and additional 250MB space for each referral when they signup and install dropbox client.The file upload size of Dropbox is just 300MB. All files stored on Dropbox enjoys the security of 256 bit SSL encryption.

– Windows Live Skydrive
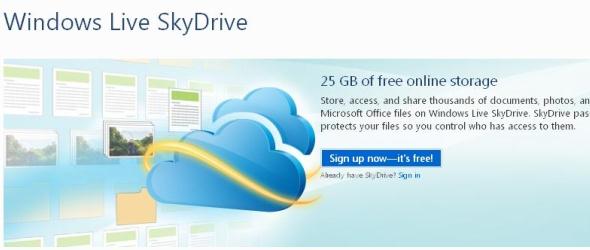
Windows Live Skydrive is also one of my preferred Online Storage service provided by Microsoft. The primary reasons for popularity of SkyDrive are the 25GB free Online Storage and the ability to work with Microsoft Office document online without installing Microsoft Office. It also Provides Photoalbum, Access control based sharing so you have the power to decide who sees what. Another USP of SkyDrive is the SkyDrive synced storage available through Windows Live Mesh, which enables syncing of Photos and videos between your computer and SkyDrive. With so many features Windows Live SkyDrive online storage service is also a must have recommendation from us.

– Amazon Cloud Drive

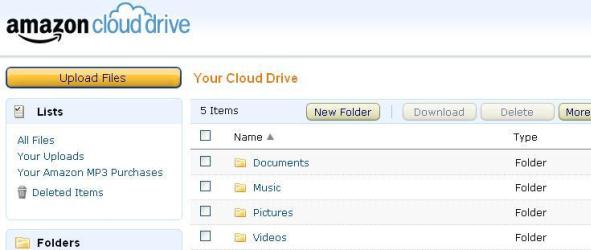
Amazon Cloud Drive is the newest offering from Amazon and has been launched just a couple of days ago. It gives 5GB of free Online Storage to store your important files, documents, photos and music securely in the cloud. As of now there is no desktop or mobile client for syncing files, so need to upload the files manually. However it supports file upload size of 2GB which a great advantage. I seriously hope that Amazon will come up with a desktop client for file synchronization and also a mobile client for access to files on the go. This will make Amazon Cloud drive as one of the most preferred Online Storage solution.

If you are located in United States and wish to upgrade the Amazon Cloud Storage space to 20GB, you can do so by spending just $1. The normal price for 20GB space is $20 per year, however if you buy a mp3 song from Amazon music store, Amazon will upgrade the free user limit to 20GB. Amazon music store is only available to US customers. Thanks Amit from Digital Inspiration for the tip.

– FlipDrive

The FlipDrive has quite impressive functionalities however it has limited features for free users. It offers only 1GB storage for free users and the cheapest plan starts at $4.95 per year. It synchronizes and  backup your files, folders, photos, music, contacts and calendars. With so many features we definitely need some additional space for free users. Moreover they do not have any referral program by which we can increase the storage limit for free account. This also does not have a desktop client available at this moment. So the sync process is purely manual.

-Adrive

The only reason we put Adrive in the list is because of the amount of disk space it offers. Adrive offers 50GB of free online storage. Apart from the massive amount of storage nothing looks impressive for ADrive. It does not have mobile access or a desktop client for syncing but supports both file and folder upload through browser using Java applet. Ads appears in the user interface and the UI looks very clutter. Overall if you wish to store a lot of junk items Adrive can be your preferred choice of service.

These online storage services not only make our files available to us whenever and wherever we need those, but they also give us an extra layer of protection by keeping a backup copy of our most important files. I usually use Online Storage for syncing files between my work and home PC and keep a backup copy of my most important documents and photos so that I will never lose them even if my hard drive or the backup DVD is gone. Please let us know which Online Storage service you are using and for what purpose you primarily use.
Categories
Webmaster Wordpress

How to make your WordPress site faster

If you have a blog running on a WordPress installation you might have noticed that the loading time of the blog is not as impressive as other non wordpress based sites. WordPress is database driven and is developed with PHP and MySql. Contrary to a static html based website where all the available pages are already present, WordPress generates the pages on the fly with the help of database queries. If you are on a shared hosting, where there are restrictions in CPU usage and system resources, it is very much required to make your WordPress installation as optimized as possible. Failing this your site will be very very slow and increase server load considerably resulting in cancellation of your hosting account. Also a faster site will provide a better user experience and a lesser bounce rate. It has been noted that 40-60% of daily visitors to a site are first time visitors so they come with an empty cache. Making your page fast for these first time visitors is key to a better user experience.

There are various ways to improve the load time of any websites, but in this topic we will primarily discuss about a WordPress based website. Following the methods described below will definitely make your website lot faster as well as reduce the load on the server.

1. Optimizing the header.php

If you look at the header.php file of a WordPress theme, you will see a lot of php codes in it. For the easier usage of themes the theme developer usually pulls lot of data from the database. But when we install the theme we need to make as many option static and hard coded as possible. Making the header of any WordPress theme static/hard coded will reduce almost 10 to 12 queries. Let’s see this with an example of one of our in-house developed theme Mashlife:

We have the following lines in header.php that can be changed to hard-coded code once this theme is installed on a website.

<meta http-equiv="Content-Type" content="<?php bloginfo('html_type'); ?>; charset=<?php bloginfo('charset'); ?>" />
<link rel="stylesheet" type="text/css" href="<?php bloginfo('stylesheet_url'); ?>" media="screen" />
<link rel="alternate" type="application/rss+xml" title="<?php bloginfo('name'); ?> RSS Feed" href="<?php bloginfo('rss2_url'); ?>" />
<link rel="alternate" type="application/atom+xml" title="<?php bloginfo('name'); ?> Atom Feed" href="<?php bloginfo('atom_url'); ?>" />
<link rel="pingback" href="<?php bloginfo('pingback_url'); ?>" />
<link rel="shortcut icon" href="<?php bloginfo('template_directory'); ?>/images/favicon.ico" />
<script language="javascript" type="text/javascript" src="<?php bloginfo('template_url'); ?>/javascripts/jquery.js"></script>
<script language="javascript" type="text/javascript" src="<?php bloginfo('template_url'); ?>/javascripts/tabber.js"></script>
<script language="javascript" type="text/javascript" src="<?php bloginfo('template_url'); ?>/javascripts/superfish.js"></script>
<script language="javascript" type="text/javascript" src="<?php bloginfo('template_url'); ?>/javascripts/lazyload.js"></script>

The above codes can be easily changed to the below code and it will still give the same result.

</pre>
<meta http-equiv="Content-Type" content="text/html; charset=UTF-8" />
<link rel="stylesheet" type="text/css" href="http://sitename.com/wp-content/themes/themename/style.css" media="screen" />
<link rel="alternate" type="application/rss+xml" title="Sitename RSS Feed" href="http://sitename.com/feed/" />
<link rel="alternate" type="application/atom+xml" title="Sitename Atom Feed" href="http://sitename.com/feed/atom/" />
<link rel="pingback" href="http://sitename.com/xmlrpc.php" />
<link rel="shortcut icon" href="http://sitename.com/favicon.ico" />
<script language="javascript" type="text/javascript" src="http://link-to-javascript-folder-in-theme/jquery.js"></script>
<script language="javascript" type="text/javascript" src="http://link-to-javascript-folder-in-theme/tabber.js"></script>
<script language="javascript" type="text/javascript" src="http://link-to-javascript-folder-in-theme/superfish.js"></script>
<script language="javascript" type="text/javascript" src="http://link-to-javascript-folder-in-theme/lazyload.js"></script>

The best way to convert the dynamic php code to hard-coded static html code is, by viewing the source of the website and copy those lines directly from the source and replace with corresponding lines in header.php. The above example will reduce the database queries by 10.

2. Optimizing the footer.php

The footer area in WordPress blog is served by footer.php file. This file also contains some lines of code that can also be converted to static hard-coded html code. You can look for Powered by line and also “template_directory” lines in the code and replace them accordingly (refer the tips in header optimization. In our Mashlife theme we can replace the following codes:

<a href="http://qlogix.net/"><img src="<?php bloginfo('template_directory')?>/images/logo-small.png" width="97" height="25" alt="Qlogix Solutions" /></a>
<a href="http://wordpress.org/"><img src="<?php bloginfo('template_directory')?>/images/wp-logo.png" height="25" alt="Wordpress" /></a>

With this one:

<a href="http://qlogix.net/" title="Qlogix Solutions"><img src="http://techiezone.net/wp-content/themes/mashlife/images/logo-small.png" width="97" height="25" alt="Qlogix Solutions" /></a>
<a href="http://wordpress.org/"><img src="http://techiezone.net/wp-content/themes/mashlife/images/wp-logo.png" height="25" alt="Wordpress" /></a>

This changes will reduce another 2 queries to the database.

3. External Stylesheet and script:

Put the stylesheets and java scripts in external files so that these files will be cached by the web broswer and will not be downloaded upon every page visits. This will also reduce the size of html document.

4. Reduce the number of http requests:

Each mention of style sheets and scripts in an html/php document increase the http request by one there by increasing load time. So whenever possible combine all css into one style sheets and all scripts into a single scripts. For images, the best method to reduce http request is the use of CSS Sprites.

Also note that the plugins add Database queries as well as style sheets, those style sheets will again take additional queries to retrieve the style information. We can combine these styles with our theme’s style sheet and reduce queries as well as clutters in the website. To see if any plugin is adding style sheets and Javascript, just view the source of the website and look in the header and footer area.

<p id="line28"><link rel="stylesheet" href="<a href="view-source:http://techiezone.net/wp-content/plugins/sharebar/css/sharebar.css">http://techiezone.net/wp-content/plugins/sharebar/css/sharebar.css</a>" type="text/css" media="screen" />

A code like above indicates that the sharebar plugin in my WordPress installation is adding styles through sharebar.css file. WordPress beginner has a nice post detailing the effects of WordPress plugin to site load.

5. Remove unnecessary plugins:

Use only the required plugins, do not over load your WordPress installation with unnecessary plugins which is not serving any real purpose. Most of the time I am tempted to install plugins to achieve something which is not really required. So always stay away from those plugins. We will publish a list of really important plugins for WordPress in a  future post.

6. Use a caching plugin:

The caching plugins like WP Super Cache creates html version of your WordPress pages which is directly served by Apache. This method of serving webpages does not require processing large chunk of php codes on each request, hence this substantially increase page load time to a higher extent and reduce server load.

7. Minify Javascript and css:

Minifying is the process of removing unnecessary characters, white spaces and comments from the code to reduce the size, which in turn improves the load time. You can use WP Minify plugin to compress and combine your css and javascript files. The WP Minify grabs JS/CSS files in your generated WordPress page and passes that list to the Minify engine. The Minify engine then returns a consolidated, minified, and compressed script or style for WP Minify to reference in the WordPress header.

8. Use Yslow to determine the load issue:

Yslow by yahoo is a Firefox extension which works wth Firebug add-ons. It analyzes web pages and suggests ways to improve their performance based on a set of rules for high performance web pages.

The above methods can be performed by any one and will help in page load time to a great extent. There are other methods which may not be as easy as the above and can not be recommended for a newbie, also they may incur cost like using Content Delivery Network (CDN) to serve your static contents.

Please let us know if your site load time increased after following the methods listed here. Also please share any other emthods which you feel will contribute to sites load time without lot of efforts.


Categories
Internet Social Media

Prevent the Facebook Virus “Get your Facebook Email” @facebook.com

It has been seen recently that Facebook has been the primary target for Scamsters like spammers and hackers. We have seen quite a lot of virus like ” Click here to see how I look like in 20 years” and “OMG I don’t believe this” spreading in Facebook now a days. The most recent one is the “Get your Facebook Email” @facebook.com. These viruses are spreading in the form of Facebook Apps and advertise themselves through Facebook chat messages. Many people think these are legitimate messages from their friends and fall victim to it. So this way the virus spreads themselves exponentially in a very short period of time.

Today I received a message from one of my blogger friend which said Hey claim your @ fb email address b4 its 2 late! bit.ly/fA05Dk. In a moment the suspicious me, found out that it is another hoax message. But I wanted to delve into it further. So I clicked on the link and found out that it is the work of a new App called ownuniqueemail. It seems I was among the first one to receive this message as at the time when I tried to access the app, it had only 2 fans. My suspicion grew stronger when I saw a message that the Application can not be accessed over https. (As I have enabled https in Facebook for better security). Within a couple of minutes I started receiving this hoax message from many friends. All saying the same thing in different variant and using different URL shortening service pointing to same app.

What does it do?

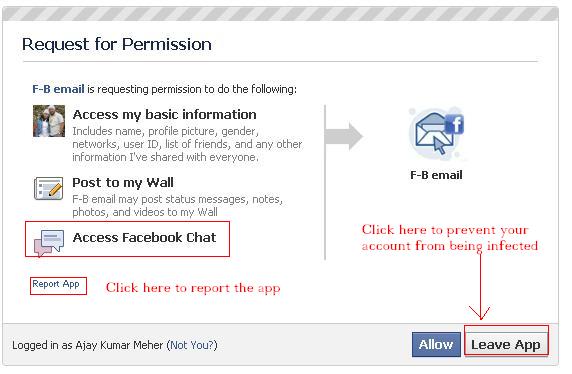
When you receive a message from your friend and you click on the link, the app will ask for your permission to integrate with your Facebook account. In the permission page it will also ask the permission to access Facebook Chat. Once you grant access that’s all. It will send a message to all your facebook friends which says “Get your Facebook Email” @facebook.com or “Hey claim your @ fb email address b4 its 2 late! bit.ly/fA05Dk” or some other variant of this message. In a very short span of time this App will spread virally. This has not been seen to cause any harm or steal/hack any account. This is just a self promoting application.

How to prevent “Get your Facebook Email” @facebook.com virus?

1. If you have enabled the https in Facebook account security section, you will see a message to switch to regular connection, when you click on the link to go to the apps page. So it will prevent you from direct access of the App. You can click on cancel on this page. Moreover this viral app can not be accessed over https. So you are somewhat safe.

2. Even if you have clicked on the link do not grant permission in the next page where it says “Request for permission”.  Just click on leave App and you are safe. As a contribution towards the community, you can instead click on Report App on the same page.

3. Ask your friends not to believe this message they received and refrain from sharing it. Also share this blog post with them and post about this post on FB wall. (I know this is a shameless promotion of my blog post, but at least it will help people in some ways.)

Please let us know if the post helped you and your friends by writing a few lines in the comment.

Categories
Internet Software

Convert Flash to HTML with Wallaby

Adobe has finally heard my plea and it’s a dream come true for me. I always wanted a way to convert the Flash (.fla) files to html for universal compatibility, and now I have an app that will help me to convert the .fla file to html5. The main benefit of converting the .fla to html is that we can view the product in any device that does not support flash run-time but supports html (which almost all the devices do). All this is possible with the help of an experimental technology developed by Adobe System called Wallaby currently available as a free download in Adobe labs. The biggest beneficiary of this will be the iOS users, like users of iPhone, iPad and iPod tocuh.


Wallaby converts Adobe Flash Professional (.fla) files into html5 format. Once converted into html5 version, this can be edited using any html editor and can be used with any device that supports html5. All standard web browsers now support html5. Just to add here, .fla is the raw file format for any flash application which is then converted (and compressed) to swf and is embedded on a web page. Wallaby does not have the ability to convert the .swf files to html5. So if you are thinking that you can now convert any embedded flash files to html5 and modify it according to your desire, you may be out of luck as there is no direct conversion possible. However you can use a swf decompiler tool to convert .swf to .fla and then use Wallaby to convert .fla to html5. Where wallaby is offered for free by Adobe, you might have to shell out a few buck to own a swf decompiler.

Wallaby offers immense possibility of usage of flash components in non-flash supported devices, as these can now leverage the power of html to have the same effects and functionality as flash. For example the flash based advertisement in mobile devices.

Things we must know before jumping to a conclusion:

1. It is only an early preview version, so offers very basic set of features. Many of the flash features are not supported under html5. The wallaby Release notes give a list of supported and unsupported features.

2. It is currently available as a 32 bit installer for Windows and Mac.

3. Wallaby can not convert .swf file to html5 directly. We need a 2 step process for that, which involves an application like swf decompiler.

4. At this time it uses Wekit css3 tags, so compatible with Webkit based browsers. This means the html5 output is not supported in Firefox or IE 9. As of now only supported browsers are Chrome(8.0 or later)  and Safari(5.0 or later).

If you are satisfied and want to give a try to Wallaby, you can download wallaby for free and see it in action, use it and submit any feature request and bugs.

My verdict is: Wallaby has immense potential to be a revolutionary product in future. Please share your opinion and experience with Wallaby & it’s future potential.

Categories
Internet Tips & tricks

How to type in your native language

Are you wondering, how your friends send you scrap in Hindi/Oriya/Tamil or how they update their Facebook status message in Hindi/Oriya/Tamil. If you use Orkut (seen in some other Google application like blogger, Gmail) you would have seen that there is an option to type in your native Indian languages like Hindi/Bengali/Tamil etc. This is all possible because of a technology called Transliteration. There are various Transliteration provider, but the one provided by Google is very accurate and offers lot of fucntionalities. Transliteration converts the typed English characters into a native language based upon how it is spoken. It is not same as translation. So with the help of Transliteration tools you can phonetically type a word in English using a roman keyboard and it will be converted to the desired native language. So when you type Mera Bharat Mahaan, it will be converted to मेरा भारत महान.

Google Transliteration tools are available in different formats like Transliteration Bookmarklet, Transliteration IME and a dedicated website.

The Goolge Transliteration website is a dedicated website by Google which can be used to type in 24 supported language like Amharic, Arabic, Bengali, Chinese, Greek, Gujrati, Hebrew, Hindi, Japanese, Kannada, Malayalam, Marathi, Nepali, Oriya, Persian, Punjabi, Russian, Sanskrit, Serbian, Sinhalese, Tamil, Telugu, Tigrinya and Urdu. Using this website you can type whatever you want and then copy the transliterated version of the text and paste it wherever you wish. I selected Hindi from the drop down and typed my name in English using my normal keyboard and it got converted to अजय कुमार मेहेर.


Google Transliteration Bookmarklet is another way to use the transliteration service in any website with a text box to type. This bookmarklet is a simple piece of code which resides in the browser and provides you the option to chat, compose an email, update Facebook status or send scrap in your native language. Google Transliteration Bookmarklets are available in 19 different languages – Amharic, Arabic, Bengali, Greek, Gujarati, Hindi, Kannada, Malayalam, Marathi, Nepali, Persian, Punjabi, Russian, Sanskrit, Serbian, Tamil, Telugu, Tigrinya and Urdu. In order to use the Transliteration bookmarklet fature, you need to drag the appropriate bookmarklet to your browser’s bookmark toolbar.  For example to type in Hindi Drag the following bookmarklet to your Bookmark toolbar.

Type in Hindi

Transliteration IME offered by google is an Input Method Editor(IME) a very small program which allows to enter text in your native language using a standard Roman keyboard. Google Transliteration IME is available for 22 different languages – Amharic, Arabic, Bengali, Farsi, Greek, Gujarati, Hebrew, Hindi, Kannada, Malayalam, Marathi, Nepali, Oriya, Punjabi, Russian, Sanskrit, Serbian, Sinhalese, Tamil, Telugu, Tigrinya and Urdu. The Google IME provides the most advanced features and lot of customization. We ned to install a separate IME for each language. Once installed, it will show a status window at the bottom right corner of desktop. It has options to change language as well as settings option. This page provides further information about the Google transliteration IME.

Categories
Web hosting Webmaster

How to overwrite php.ini settings using .htacess

Couple of days back I was working on a project for one of my clients. During that I came across a situation where in I had to set display_errors in php.ini to On for the particular client’s application. But in my WebServer I preferred to keep display_errors to Off. I did not want my original php.ini file to change and let the effect flow to all sites hosted in my WebServer. In such situations we always have alternatives method to make our task easier and achieve what we wish.

So before I proceed with the method to achieve the result, let me introduce you to php.ini. It is the configuration file used to customize the behavior of PHP in runtime. When PHP is started it looks for the php.ini file and load the desired settings. There is lot of confusion among fellow webmasters about the location of original php.ini file in the webserver. Depending upon the configuration of the webserver php.ini file can be found in any of the following locations:

/etc/php.ini

/etc/php/php.ini

/etc/php5/php.ini

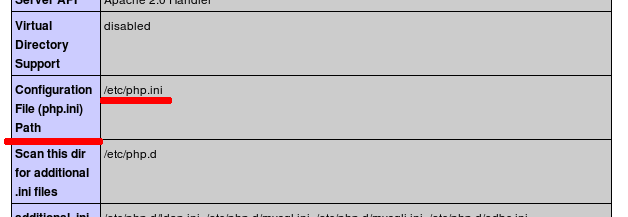
The best way to find where the php.ini file is by using the phpinfo() function. Create a file called info.php and paste the following code inside it. Put this file in the root directory of your website.

<?php phpinfo() ?>

When you execute this file through web browser it will show you the different php settings including the location of php.ini file.

.htaccess (Hyper Text Access) is a directory level configuration file primarily used by Apache webserver, that allows decentralized management of web server configuration. You need to create the .htaccess file in the document root of your website through ftp as Windows will not allow you to create/rename files to .htaccess (or any name starting with dot)

As we are familiar with php.ini and .htaccess by now, let’s look at the method to overwrite the php.ini settings for each script or website. When we are on a shared hosting and we do not have access to the global php.ini file, at those moments this method of overwriting php.ini settings through .htaccess will definitely come as a rescue.

– If you do not have an .htaccess file in your website document root create one through ftp

– In the .htacess file put the required php settings in the following format:

<php_flag> <settings_name> <Settings_value (On|Off)>

<php_value> <settings_name> <Settings_value>

The php_flag is used to set the directive to boolean values, for example for the directives like display_errors or set_register_globals which takes On|Off as values

The php_value is used to set the directive to actual values like upload_max_filesize which takes values like 10M or 20M

After you make changes in .htaccess file the sample htaccess content should look like this:

### Custom php.ini setting
php_flag display_errors On
php_value  max_upload_filesize  10M

Note: this .htaccess method only works if you are using Apache webserver.

Categories
Browsers Internet Product release Tech News

Firefox 4 Release date and Features walkthrough

An Update to the post has been provided at the bottom. Mozilla took down the ftp download link.

Finally the wait is going to be over in a couple of hours when the much awaited Firefox 4.0 will be released on 22nd March 2011. All thanks to Microsoft for releasing IE 9. The war of the browser has intensified. As IE 9 has been released last week and people are quite gung-ho about the new Internet explorer, Mozilla could not have delayed the release of the final version of Firefox 4. So the decision came at the right time.

The Release Candidate (RC) version of a program can be regarded as the final version when functionality or design is concerned. So the final version of Firefox 4 will sport the same look and offer same functionality as the RC version. So let’s have a quick look at the features and improvements we are going to see in Firefox 4.

– User Interface

> Menu Bar

The menu bar is by default hidden in Windows Vista and Windows 7. This is to give it a more consistent look with the User Interface of the OS. Instead of the menu bar you can see a new Firefox button in orange color at the top left corner. (It mimics the Opera).

> Tabs

The tab position has been moved to the top of the Window. This is to give more visual priority to the tabs. But while switching to Firefox 4, you might feel it bit awkward especially if you are regular Firefox user. After I switched to Firefox 4, I have looked for the tabs in it’s old location because of the habit :).

Firefox Panorama is another improvements which organizes tabs into groups and lets you perform various operations on tab groups.

Switch to Tabs is another feature in Firefox 4 which lets you switch to an already opened tab when you type the same website name.

App Tab feature in Firefox 4 lets you keep the always open sites like Web Mail, Facebook etc a permanent position on the browser. So you do not need to have a separate tab for those. Just right click on the opened Tab and Select Make into App Tab and you are done.

> Stop/Refresh/Go button

The stop, Refresh and Go button has been combined into one and placed at the right of address bar. The buttons appearance changes dynamically depending upon the page status.

Overall the improvement is user Interface gives Firefox a much need look and removes lot of clutter present in older versions.

– Firefox Sync:

The Firefox Sync is an Add-on released for earlier version of Firefox. But With Firefox 4 this feature is built-in. Firefox Sync helps in  synchronizing bookmarks, browsing history, passwords, preferences  and last 25 opened tabs across multiple computers. The user data are synced to Mozilla seever and kept there in an encrypted format and it is synced to PCs you use.

– New Add-on Manager

Firefox 4 sports a brand new Add-on manager window. This new Add-on manager gives an easier way to manage Addons and personalizing the browsing. The new add-on manager has 4 categories viz. get Add-ons, Extensions, Appearance and Plugins.

Apart from the above visual changes, there are a lot of changes as given below in the core as well as security improvements in Firefox 4 which undoubtedly makes Firefox the best browser.

– Complete CSS3 and HTML 5 support

– Supports WebM video standard so you can watch HD quality video and 3D graphics support through Web GL.

– Integrate Multi Touch support for Windows 7.

– Support for different platform like Windows, mac and Linux.

– Improved security through HSTS (Http Strict Transport Security)

– Firefox 4 is the fastest browser in handling JavaScript, thanks to JagerMonkey JavaScript engine.

-Download

The Firefox RC download link is available at the Mozilla Firefox web page. However it says it is the RC 2 release and the file name is Firefox Setup 4.0 RC2.exe however the FTP location of Mozilla gives this file Firefox Setup 4.0.exe

When I installed the file from FTP location it still says Mozilla Firefox 4 like the RC version when you click on Help > About. It may happen that Mozilla has already kept the final version in the ftp as they are getting ready for the release.

UPDATE:

After many bloggers published the news of the presence of final version of Firefox 4.0  in Mozilla FTP repository, they have taken down the download link and now the link says “Page Cannot be displayed”. I noticed this at IST 2.40AM.

UPDATE:

The link has not actually been taken down, but gives a permission denied error when tryng to downlaod drectly. SO go to the following link and right click on Firefox Setup 4.0.exe and selct Save link as ftp://ftp.mozilla.org/pub/mozilla.org/firefox/releases/4.0/win32/en-US/

Categories
Internet

You can block unwanted search result in Google search

Yes that’s true. Google is known for pioneering new things, and this time they have leveraged some power to end users to control how the search result appears to them. In other words now an individual searcher has the ability to let a website appear in his/her search result. That means if you are nagged by irrelevant websites appearing in your search result, you can just block those sites and from next time those sites will not appear in your search result for that keyword search as well as that domain is altogether blocked from your search result. This is obviously a welcome move from Google. And low quality sites will get blocked/hidden by many experienced searchers.

Overview of the feature

With the latest set of improvements in Google search, it is now possible to control the appearance of websites in the search result. So when you are searching for something in Google and you clicked on a result but found that the resulting website is irrelevant to your search, you can block that website and it will not appear in your future search result.

This feature is currently available for search result in google.com in English for users with Chrome 9+, Firefox 3.5+ and Internet Explorer 8+. So if you are using an outdated browser then I am sorry, you will not have any luck.

How this works?

– Go to google.com and not any other Google domains like google.co.in

– Search for something and on the result page click on any search result, now go back to the search result page.

– You will see a new link (beside cached, similar) appearing near the search result where you clicked.

– Hover the mouse over the new link (block all example.com results) and it will tell you Not helpful, you can block example.com search result when you are signed in to search). Click on that block all example.com results and t will vanish with a nice funky effect from your search result page. And it will give a notification saying we will not show you results from example.com again with a Link to Manage Blocked sites and Undo the action.

– Now try to search for the same query again and you will see the particular website is no longer appearing in the search result. However at the bottom of the search page you will see an alert like you blocked X results from  example.com

The above mentioned things will work irrespective of you logged in to your Google account. However when you are signed in, then only the block for the website/domain will be confirmed and you will be able to manage the domain.

Note: In the year 2005 Google search introduced a feature called remove result but it was taken down before it was rolled out to every one. (Thanks Alex Chitu for this info). This feature has been announced by Google blog

Categories
Product release Wordpress

JetPack lets you get wordpress.com features in your self hosted wordpress

Without an iota of doubt, I would like to say that WordPress is the best and most popular blogging platform. This comes in 2 flavors, One is the self hosted version of WordPress, which is released by Automattic under GNU-GPL license. The other one is WordPress.com, which provides a free as well as paid (premium) platform hosted iin cloud to publish your blog. So even if you do not have a domain name or web server you can still create your blog as a subdomain of WordPress.com and publish it.

There are certain extremely good features and benefits that a WordPress.com users enjoys, those until now were officially not available in self hosted version of WordPress. Though some of the features like WordPress.com stats were made available in self-hosted version with the help of specialized plugins. According to the founder of Automattic & man behind WordPress Matt, it was his dream to provide feature parity between WordPress.com and self-hosted WordPress. And finally his dream has turned into reality in the form of a plugin called JetPack , which gives you all the features in WordPress.com that we always wanted in our self hosted version of WordPress.

With the launch of the first version of JetPack, following 8 features (cloud goodies) of WordPress.com will be activated in your self-hosted version of WordPress when you activate JetPack plugin. JetPack connects to WordPress.com and enables the awesome features in your self hosted version of WordPress.

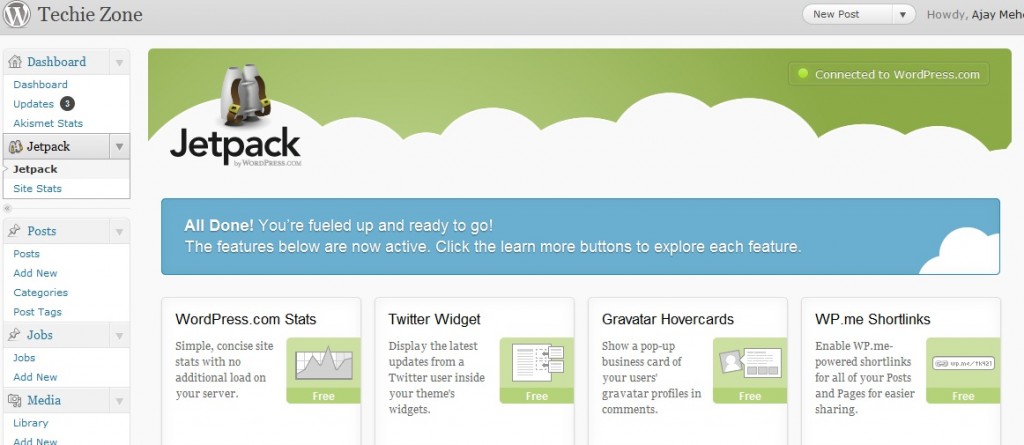
1. WordPress.com Stats : It provides a simple and concise statistics for yur website without any additional load on your server.

2. Twitter Widget: If your theme supports widget, it will show latest tweets from a twitter user.

3. Gravatar Hovercards: It is a cool feature & I always wanted to have in my website. This will show a pop-up business card of user’s gravatar profile when you hover the mouse over their name.

4. Wp.me shortlinks: The default URL shortening service from Automattic. All your posts & pages will be able to sue this for better sharing in micro blogging platform like twitter.

5. Sharedaddy: It will make the Sharing of your posts easier over the social networks & social bookmarking sites

6. Latex: is the famous markup language to insert mathematical equations inside your post and pages.

7. After the deadline: This a spelling, grammar and style checker with built-in AI.

8. Shortcode Embeds: Add movies, images, flash etc into your posts & pages with single line of code.

The list does not end here. In the coming version of the plugin, expect to see some more uberly cool features of WordPress.com.

If you are hosted with partner hosts of Automattic like Bluehost, DreamHost, Go Daddy, HostGator, Media Temple, and Network Solutions then the one click installation of WordPress available with them is JetPack enabled.  That means when you install WordPress through one click install, you do not need to install the JetPack plugin separately.

Download, Install & Pre-requisite:

1. Please note that Jetpack will work only with WordPress 3.0.5 and later version, you also need a WordPress.com account (if you do not have one you can create so during the setup process. If you meet these 2 requirements,

2. Visit the JetPack website to download the plugin.

3. Unpack and upload it to the plugins directory.

4. Log in to WordPress admin area and Activate the JetPack plugin. Upon Activation, it will show you a message to connect to WordPress.com. Click on the (see the image below)

Jetpack actvation alert5. It will take you to an authorization page as shown in image below. Put your WordPress.com user name and Password and click on Authorize. If you do not have a WordPress.com account, you can create one here by clicking on need an account.

6. Upon successful authorization, you will be redirected back to your WordPress admin area and jetpack setting page will be shown. This looks like the one in the below image:

JetPack Dashboard

From here, you can customize the required features. JetPack not only connects you to WordPress.com  to provide awesome features, but also provides you the convenience of not installing several plugins.

Categories
Tutorials Windows

Best Ways To Deal With Errors Related To Malware Infection

Malware programs, such as virus, trojan, adware, spyware, and other variants are not only a grave security threat, but they also cause various errors by interfering with other running processes and corrupting the registry. Symptoms of malware infection include:

1. Frequent random application and system errors.
2. Sluggish computer performance.
3. Frequent system freeze ups.
4. Frequent software and system crashes.

If your Windows PC is showing any or all of the above symptoms, chances are that your PC is infected. Take action before it’s too late – a severely infected PC may stop functioning completely, a situation from where the only retreat is formatting Windows.

I am going to elaborate on couple of malicious processes that may be running in your PC and how to remove the malwares effectively.

Brief description of the three most harmful processes

d.exe – This process is registered as a trojan and is spread over the Internet through email attachments. d.exe is designed to steal your personal information.

smss.exe – This process is also registered as a trojan and if present can causes havoc by causing frequent errors and performance related issues. Just like other trojans, smss.exe is effective in stealing a user’s confidential data that it passes to it’s home server.

wscntfy.exe – This malicious process creates numerous other processes, accesses user’s confidential data, and communicates with other computers by creating a TCP port on the infected computer. Immediately disable wscntfy.exe if found running and remove its associated malware.

Manual malware removal – not a recommended approach

By nature, malware programs create various harmful processes and register new DLLs on the system. Identifying all these processes and files manually is practically impossible. Besides creating new processes, malware also fills the Windows registry with various invalid and harmful entries. To ensure complete removal of malware, it is necessary that you remove all its associated files, processes, and registry entries.

How to remove malware effectively

Use a reliable antimalware tool to completely eradicate all threats from your computer. Before performing a malware scan complete the following two tasks:

– Update your antimalware software with the latest malware definitions and security updates.

– Disconnect your Windows PC from the Internet and from any other network to which it is attached.

After completing the above tasks, reboot Windows in Safe Mode and perform a malware scan on the entire system. To restart Windows in Safe Mode, perform the steps illustrated below:

1. Close all applications and restart your PC.

2. Press and hold the F8 key as Windows restarts.

3. Select the Safe Mode option in the Advanced Window Boot Option Menu.

4. Press Enter.

After you have removed the reported threats, use a professional registry maintenance tool to remove invalid and harmful entries that the malware may have added to your registry.

The methods described above are for newbie users, if you are an expert computer user, you may give the manual method of removal a try. However it involves meddling with registry and system files.